You can’t even imagine the look of horror on my husband’s face when at 7PM one evening I declared I was heading out to the garage to paint our velvet side chair. It seemed like a good idea at the time…! I could say it was my big “oops” but instead, I’m choosing to think of it as a learning experience!
Chalk Painting Velvet
I bought the chair from HomeGoods (on clearance because the frame was cracked) and it’s sat in the corner of our living room as a “display only” chair for years. I love the shape of the chair and the carved details, but never really loved the army green velvet, which had a somewhat dull appearance. I don’t know how to upholster and thought I’d try chalk painting the fabric. Sounds good, right?
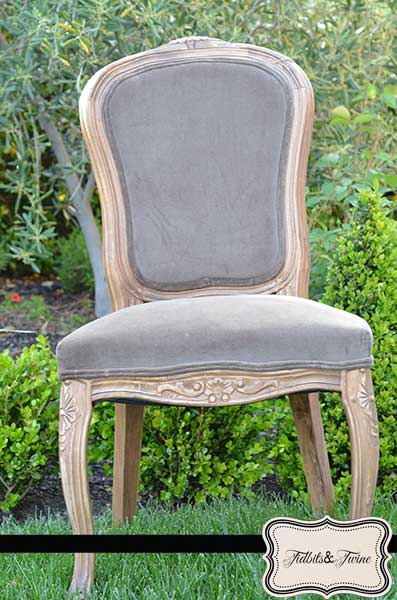
Well, here’s the bottom line. I love the new color, but not the texture or sheen. The velvet feels more like canvas now and because I had to seal it with a Satin Finish, it’s now shiny, which doesn’t have the look I want. But I will say this….I love the idea of using chalk paint to change the look of fabric so I’m sure I’ll try this again at some point, although next time, maybe not with velvet….
Project Materials
- CeCe Caldwell Vermont Slate
- CeCe Caldwell Satin Finish
- Painter’s Tape
- Purdy Brush

I ended up painting the chair with three coats of Vermont Slate, but was unhappy with the cracking and uneven coverage. So I then painted the fabric with one coat of Satin Finish, on top of which I painted two more coats of Vermont Slate. Then I sealed the chair with three coats of Satin Finish.
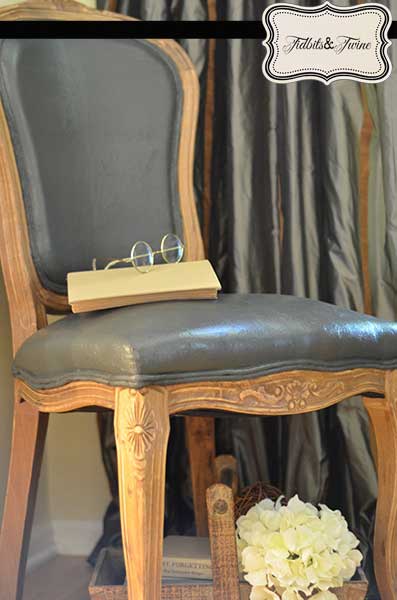
The funny thing is, just looking at the before and after pictures, I can barely tell the difference in color, although I can definitely see the difference in texture. In person, the color difference is more noticeable, though. And despite the fact that I’m not happy with how this particular project turned out, I learned a lot about chalk painting and the various painting techniques, so even an “oops” can be a good thing!
If you want to try your hand at chalk painting fabric, here are a few things that I learned along the way. (Note that these tips apply only to use on fabric, not other surfaces.)
Fabric Painting Tips & Tidbits
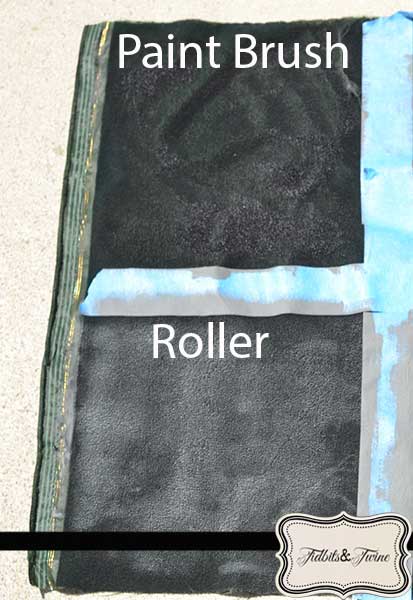
1. Use a roller, not a brush
I suppose it depends on the type of fabric and how it is used, but my experience with the velvet chair is that the fabric absorbed the paint so quickly that it was difficult to spread with a brush and resulted in a saturated, blotchy look. I did a test on a scrap piece of velvet using a paint brush and a roller and you can instantly see that there is better coverage with the roller. You’ll also end up using less paint.
2. Use the paint at full strength
I also tested out the idea of using the paint full strength versus diluted. In theory, the diluted paint might not make the fabric feel as stiff, but in reality, when the paint is diluted it takes more coats to get the same coverage and with the additional coats, it ends up feeling stiffer than the full strength.
3. Use a Satin Finish, not Wax
If you plan on sitting on the fabric, be sure to use a Satin Finish, not a Wax, because the heat from your body will heat up the wax and rub off on you while sitting. While that would make quite an impression on your guests, I don’t think that’s the impression that you want them to get from your newly painted chair!
4. You can use the Satin Finish as a base layer
The nap on velvet causes the paint to coat in some places better than in others and the surface can come out looking blotchy no matter how many coats of paint you apply. But if you paint a layer of Satin Finish and then paint over it, the Satin Finish creates a consistent base for the paint to adhere to, giving it a more even coverage. It also helps to eliminate the cracked appearance that the velvet can get as a result of the nap.
5. Be careful how you tape
While it’s important to tape off any areas that you don’t want painted, it’s equally important that you carefully remove the tape to avoid having the Satin Finish stick and peel off from the fabric. The nice thing about chalk paint, though, is that if you do get it on a part of the chair that you don’t want to paint, a little rub with a damp cloth and it will wipe right off!
If anyone has more experience with chalk painting velvet and has some suggestions for me, please let me know! Otherwise, I guess I’ll soon be teaching myself how to reupholster!

Join the Community
Let’s keep in touch! Get exclusive artwork plus the latest news delivered directly to your Inbox!
I have four ornate chairs with beautiful wood detail that I am going to chalk paint. However, they are covered in 80 year old velvet that is scaring me to death to attemp! I took a brush and just wet the fabric really well in one quarter size spot in the back of the chair , then applied chalk paint!!! The best morning it was stiff as a board and I am now at a loss on whether to proceed or not!!!!
Nearly 2 years later from your comment, but I’ve just painted velour upholstery with chalk paint. I diluted paint with water (I used 2 cups water to 1 cup paint), then apply to dry fabric (I did better without pre-dampening fabric). Let the first coat dry thoroughly (overnight), then sand it with very coarse sandpaper (I used 60 grit) until it is soft again. Vacuum thoroughly, then repeat process until you get desired coverage. Sanding & vacuuming is key, it breaks up the excess paint solids, only leaving the dyes on the fabric. Ended up almost as soft as the original velour, and very comfy to sit on.
Sandy, once you get the color coverage you want use a fine grit- 250 sand paper and sand the velvet to allow the fibers to losses and regain their texture.
Very nice, Job. Did you only do one coat of wax or 2+. What did you use to buff it with? I did a wingback chair in Emperor’s silk and it looks great. I’m worried that when I buff the chair the buffing material will stay on the fabric or something.
Thank you so much for this detailed post. I’m a novice on a mission to refinish chairs very like yours, and in gray also, but mine will have white wood and I’m starting with on-the-yellow-side-green velvet. Your post is inspiring!
Thank you!! Good luck with your project!