A look at my master bathroom remodel idea board with carrara marble and a freestanding tub!
*This post contains affiliate links and products provided by Sponsors; however, all opinions are mine. You can read my full Disclosure Policy {HERE}
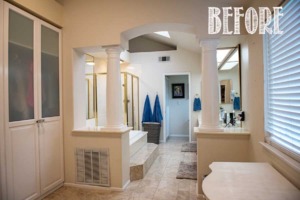
If you’re just joining us for the first time today. Welcome! I’m Kim and I’m addicted to decorating. :) I’m currently renovating my master bathroom as a participant in the One Room Challenge. You can see all of the Before photos and details from Week 1 {HERE}, but as a reminder, he’s the master bathroom before. Hello 1980’s!
This week was mostly about demo, plus some plumbing and electrical. As you can see, the columns and half walls came down because I decided I needed the extra 18″ of space. With the tub and giant step out, the floor space looks enormous!
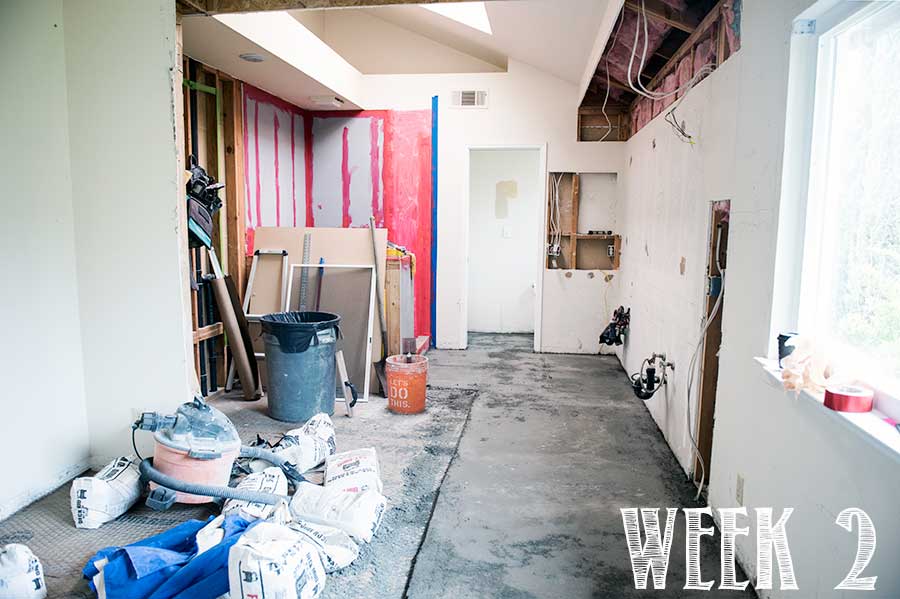
Also, by removing the columns I gained some extra length on my vanity. Whoo hoo!
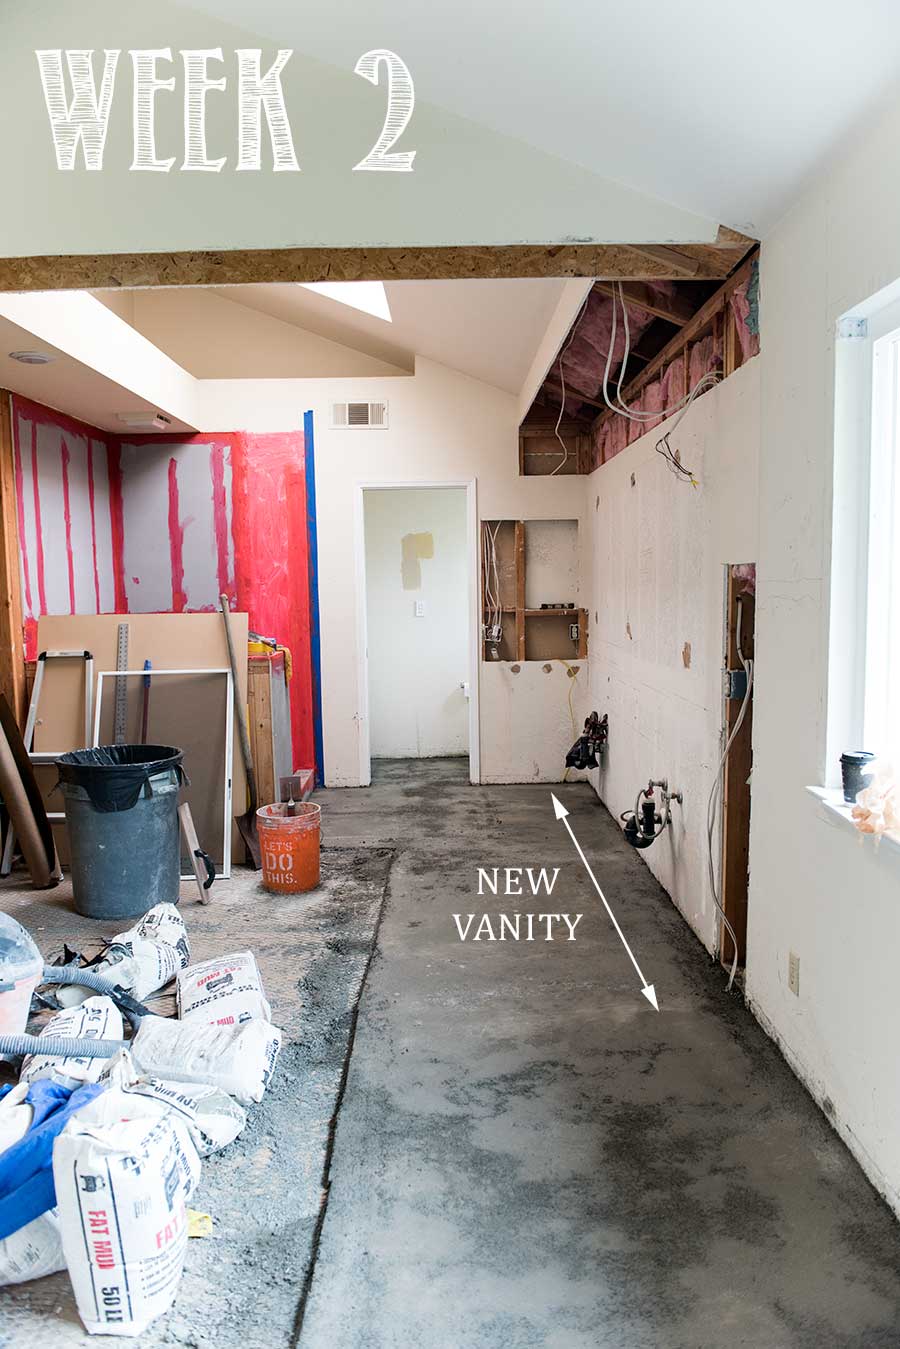
We’re building a pony wall around the shower so that I can have a bench plus tons of storage for my shower things and both will stay out of sight thanks to the wall.
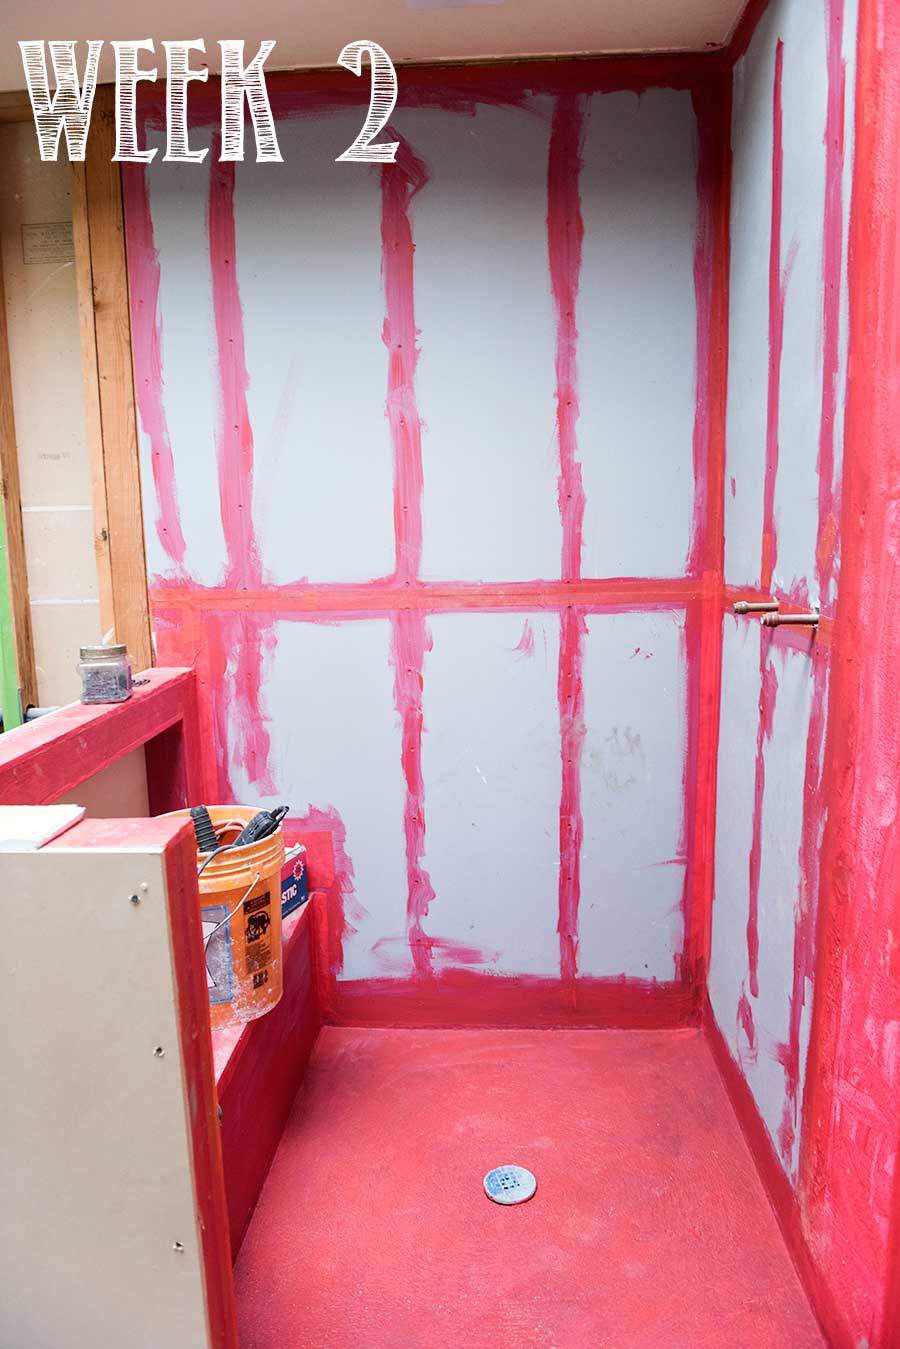
We also finalized the layout for the cabinetry in the vanity and dressing areas. More about that next week!
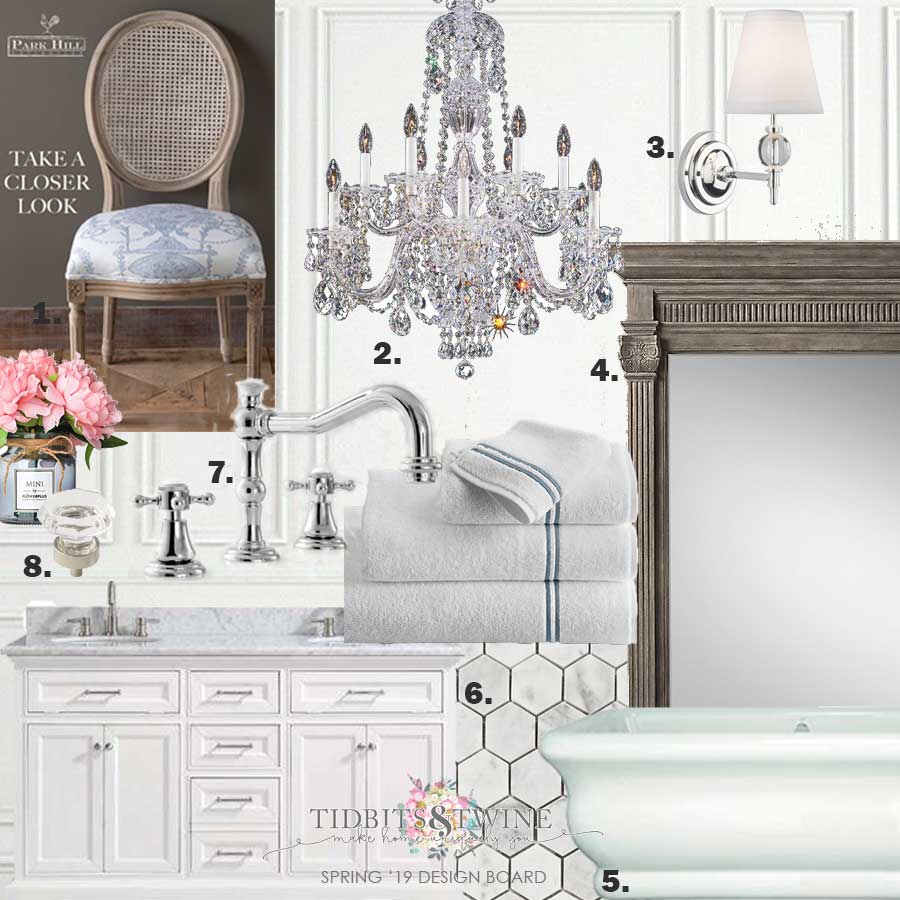
The Design Plan
I shared a brief look at my inspiration with you last week, but today I wanted to take you through my process for designing the space. If you’re not familiar with my Design Plan Process, you can read about it {HERE}.
Below is the actual process I went through in order to design the bathroom from scratch, but this also works even if you’re not doing a remodel and are just updating a room.
Step 1. Find Inspiration
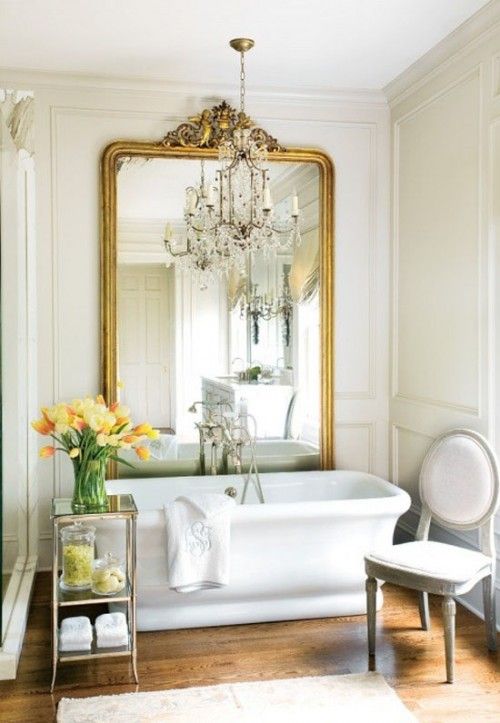
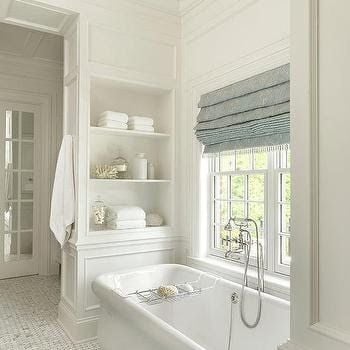
I saved this picture from Atlanta Homes & Lifestyles so long ago and it was the first thing that popped into my head when designing my master bath. This look is my signature piece…the inspiration behind my entire remodel. I am in love with the shape of this tub!
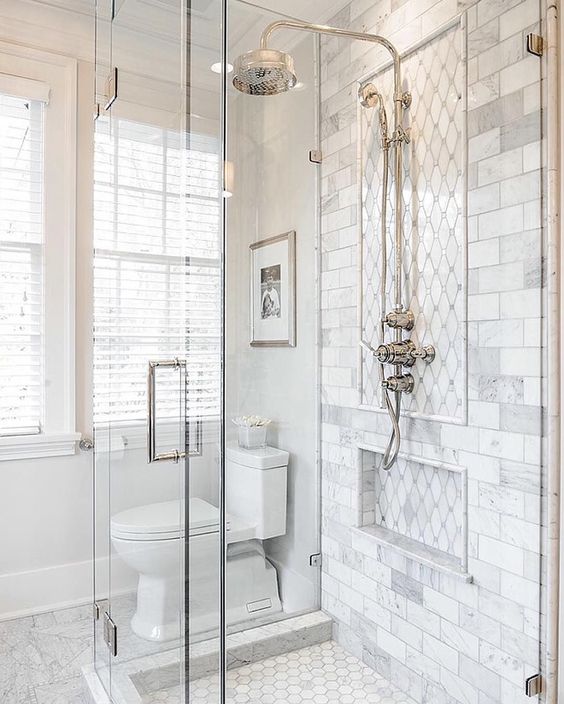
In looking at my Pinterest board, I realized that I mostly like images of bathrooms done in Carrara Marble, so that’s on my list. I love the tile pattern in this shower and am obsessed with the exposed pipe fixture!
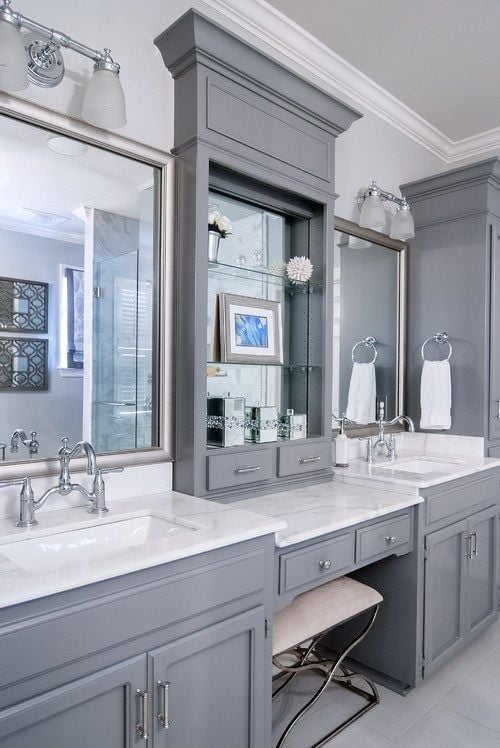
I was also inspired by this vanity, although I think I’m going to go with Kelly Moore Swiss Coffee white for the cabinetry. With my vanity length, I can sacrifice a little on the sink area to give myself a makeup area.
Lastly, I love all of the trim and moulding used here because it looks timeless to me.
Step 2. Determine Function
Vanity
I really like to sit down while I put on my makeup and dry my hair, so a vanity area is a must for me. I’d also like to get in as much storage as possible. Speaking of storage, I’m way to lazy to put my hair dryer away every day so I’d love a pullout drawer where my dryer can stay plugged in and ready for me.
I’ve actually figured out my cabinetry at this point so that it’s underway. Details next week!
Shower
Our old shower was a decent size, but I want to make it just a bit bigger so that I can include an area to rest my foot for shaving. I’d also like to find a way to hide all of our shampoo and shower stuff.
Tub
Well, you can already tell from my inspiration that I want a freestanding tub, but I don’t really take baths so I’m not interested in anything other than a soaking tub.
Dressing Area
This is what I’m calling that empty space just as you enter our bathroom. I’d love a closet for everyday clothes, drawers for additional storage, a linen cabinet, and a space for shoes!
Step 3. Determine Style & Feel
I want the bathroom to feel:
-
Calm
-
Elegant
-
Timeless
-
Clean
-
Organized
Step 4. Find
I’m still in the process of selecting all of my materials, but based on my plan above, here’s my design board.
What do you think??
I also want to take a moment to thank these amazing partners who are working with me on this makeover!


Tune in next week to see everything I’ve picked so far, plus the latest in progress photos! You can also follow along on Facebook where I often post my shopping finds as I’m out and about.


Week 1 – Week 2 – Week 3 – Week 4 – Week 5
Join the Community
Let’s keep in touch! Get exclusive artwork plus the latest news delivered directly to your Inbox!
Love the vanity. Please tell me the brand of the vanity and where you got it.
I know they exist, but I can’t even imagine a bathroom that large. My home has not one, but two very small bathrooms – I’m talking 6ft x 9ft each for a full and 3/4 bath. I would get lost for days in one like yours…… :>)
I’m sure it will be amazing once you’re through the construction mess.
Hi Pat,
I definitely realize how lucky I am to have a bathroom this size. I wish the space had been used better when the house was built, but I think with a few tweaks we can get more storage out of it. We’re now halfway done and the contractor cleaned up all of the plastic and paper yesterday so for the first time, I could actually see what it’s going to look like when finished! :) Kim
Beautiful! My dream bathroom, as well. You are just never going to want to leave this space!
Hi Sandie!
We decided when we started this project that if we were going to do this remodel, we were going to do it to exactly fit our needs. Fingers crossed it all works out! We’re halfway there at this point. :) Kim
Looks gorgeous AND huge. I am a bth lover and switched to a soaking tub from our big jetted one and love it.
Thank you, Pamela!