
Sharing the easy and efficient way for how to flock a Christmas tree so that it looks natural and beautiful! Follow these simple step-by-step instructions to flock your own tree plus my tried-and-true tips to make it even easier for you!
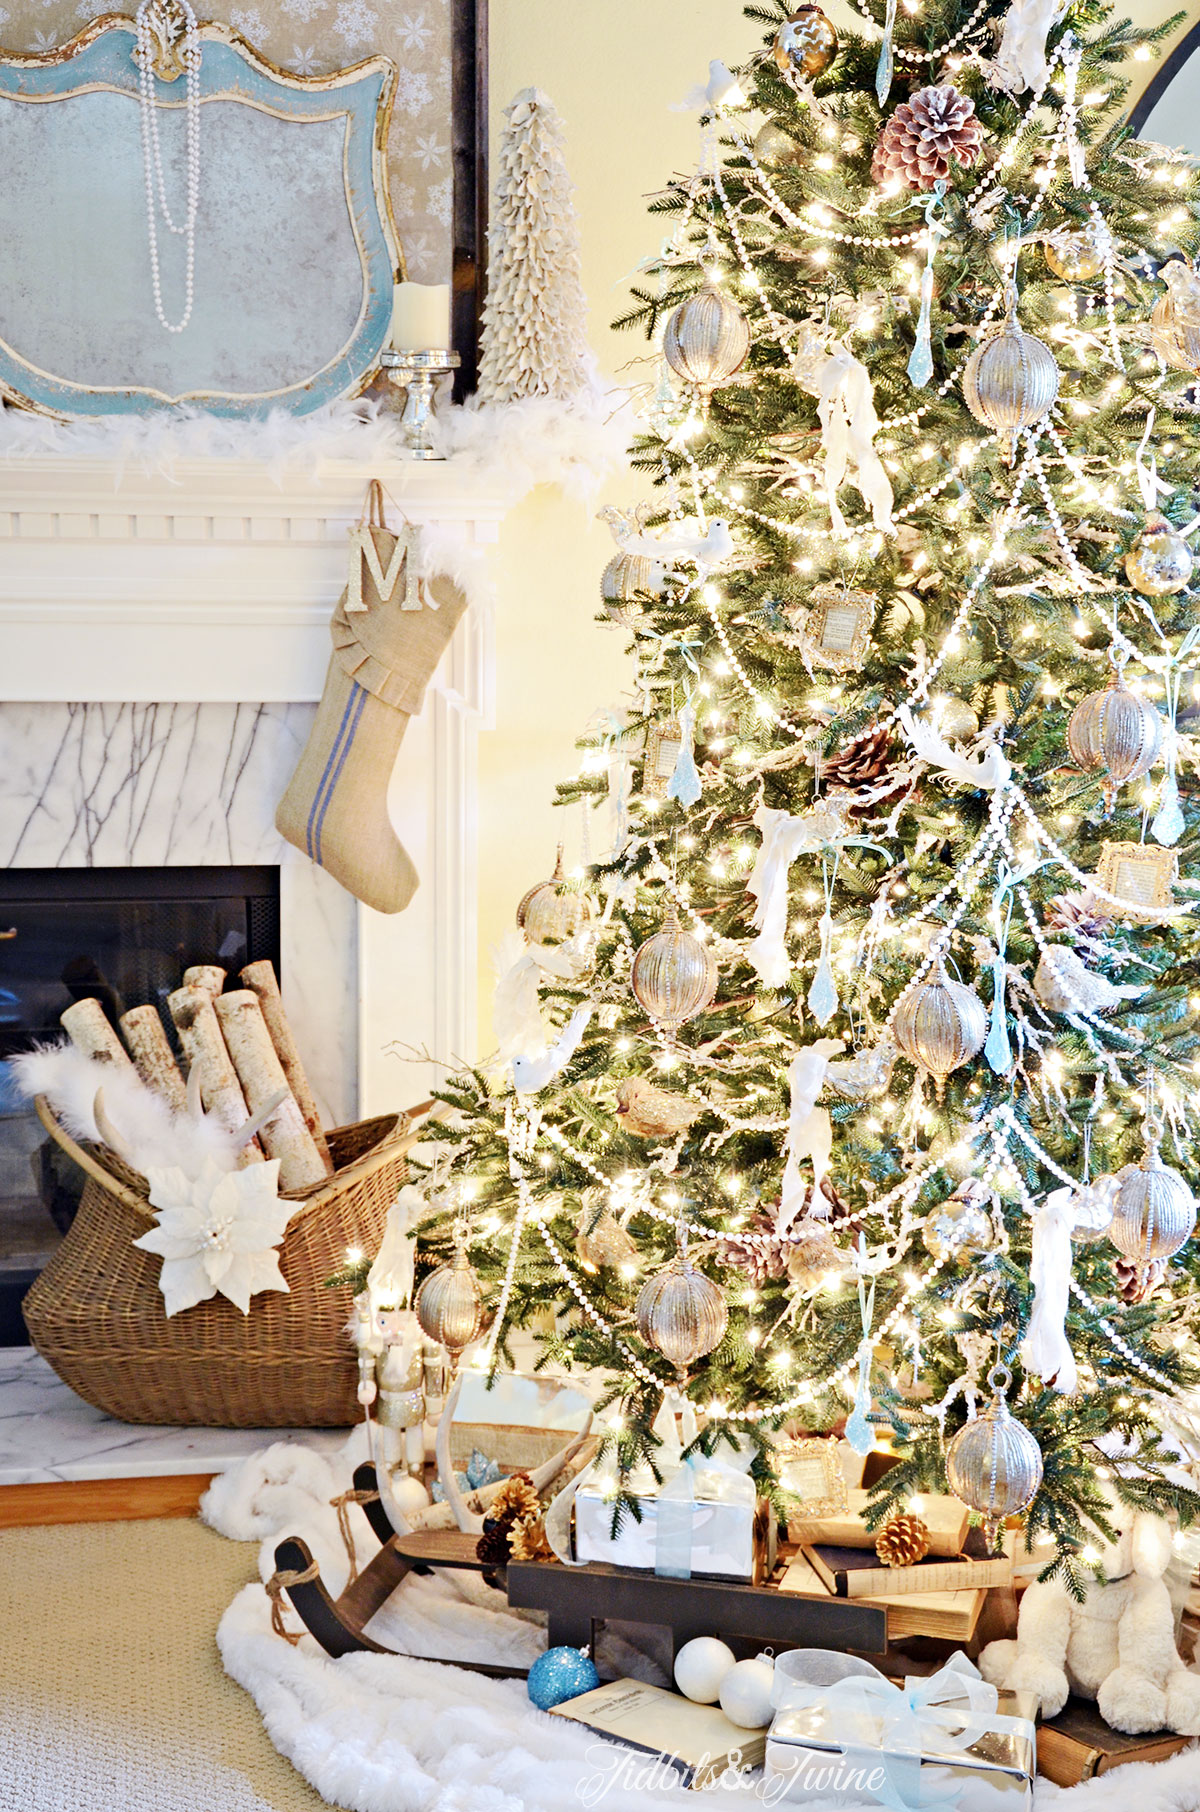
I’ve always wanted a flocked Christmas tree. I love the way that the snow-covered branches soften the look of the tree and shimmer under the lights. I really couldn’t justify buying a new tree when I already own this Balsam Hill tree.
To simulate a flocked tree, I had to get a bit creative. One year, I used snow-covered branches and stuck them into the tree to give a snowy effect.
Another year I used white feather boas to give a snowy look.

So the idea of flocking my existing tree has been on my mind for a couple of years and this year I bit the bullet and decided to tackle this project. It was so easy that I’m kicking myself for not doing this sooner!
If you’re wondering how to flock a Christmas tree, this is the ultimate guide! I’ll take you through all of the steps (with pictures) and then I’ll share some additional Tips & Tricks I learned along the way. Plus I’ll answer those additional questions you probably have!
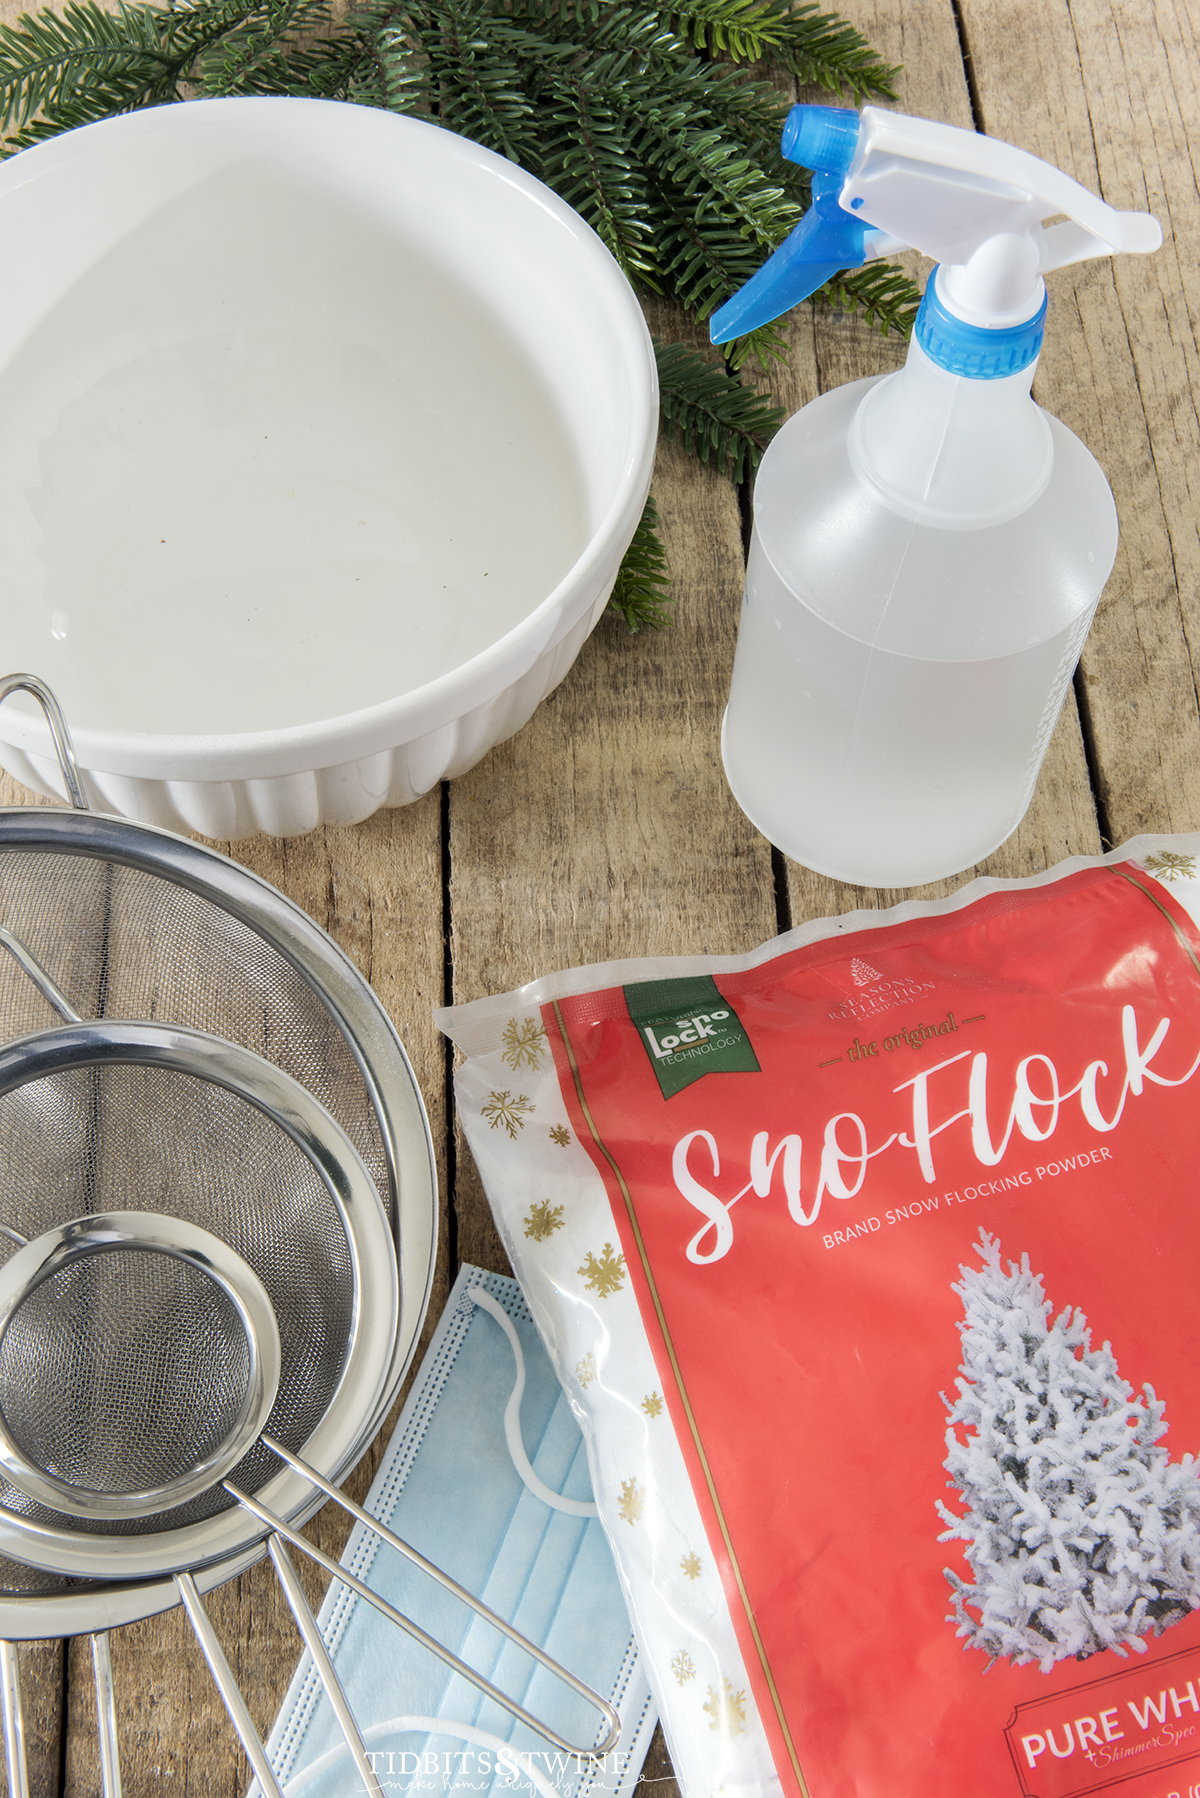
Supplies
- Flocking Powder – I think the powder looks much better than the spray. I used this flocking powder.
- Mesh strainers – Have a least two sizes on hand. Mine were from HomeGoods but this set is almost identical.
- Bowl – You’ll need this to put your strainer in so that you don’t spill flocking powder
- Spray Bottle – A small bottle will work, but larger is better so that you don’t have to refill
- Mask – No need to breathe in the flocking powder!
- Plastic Sheeting – Optional but necessary if flocking indoors
How to Flock a Christmas Tree
Step 1: Assemble and Fluff
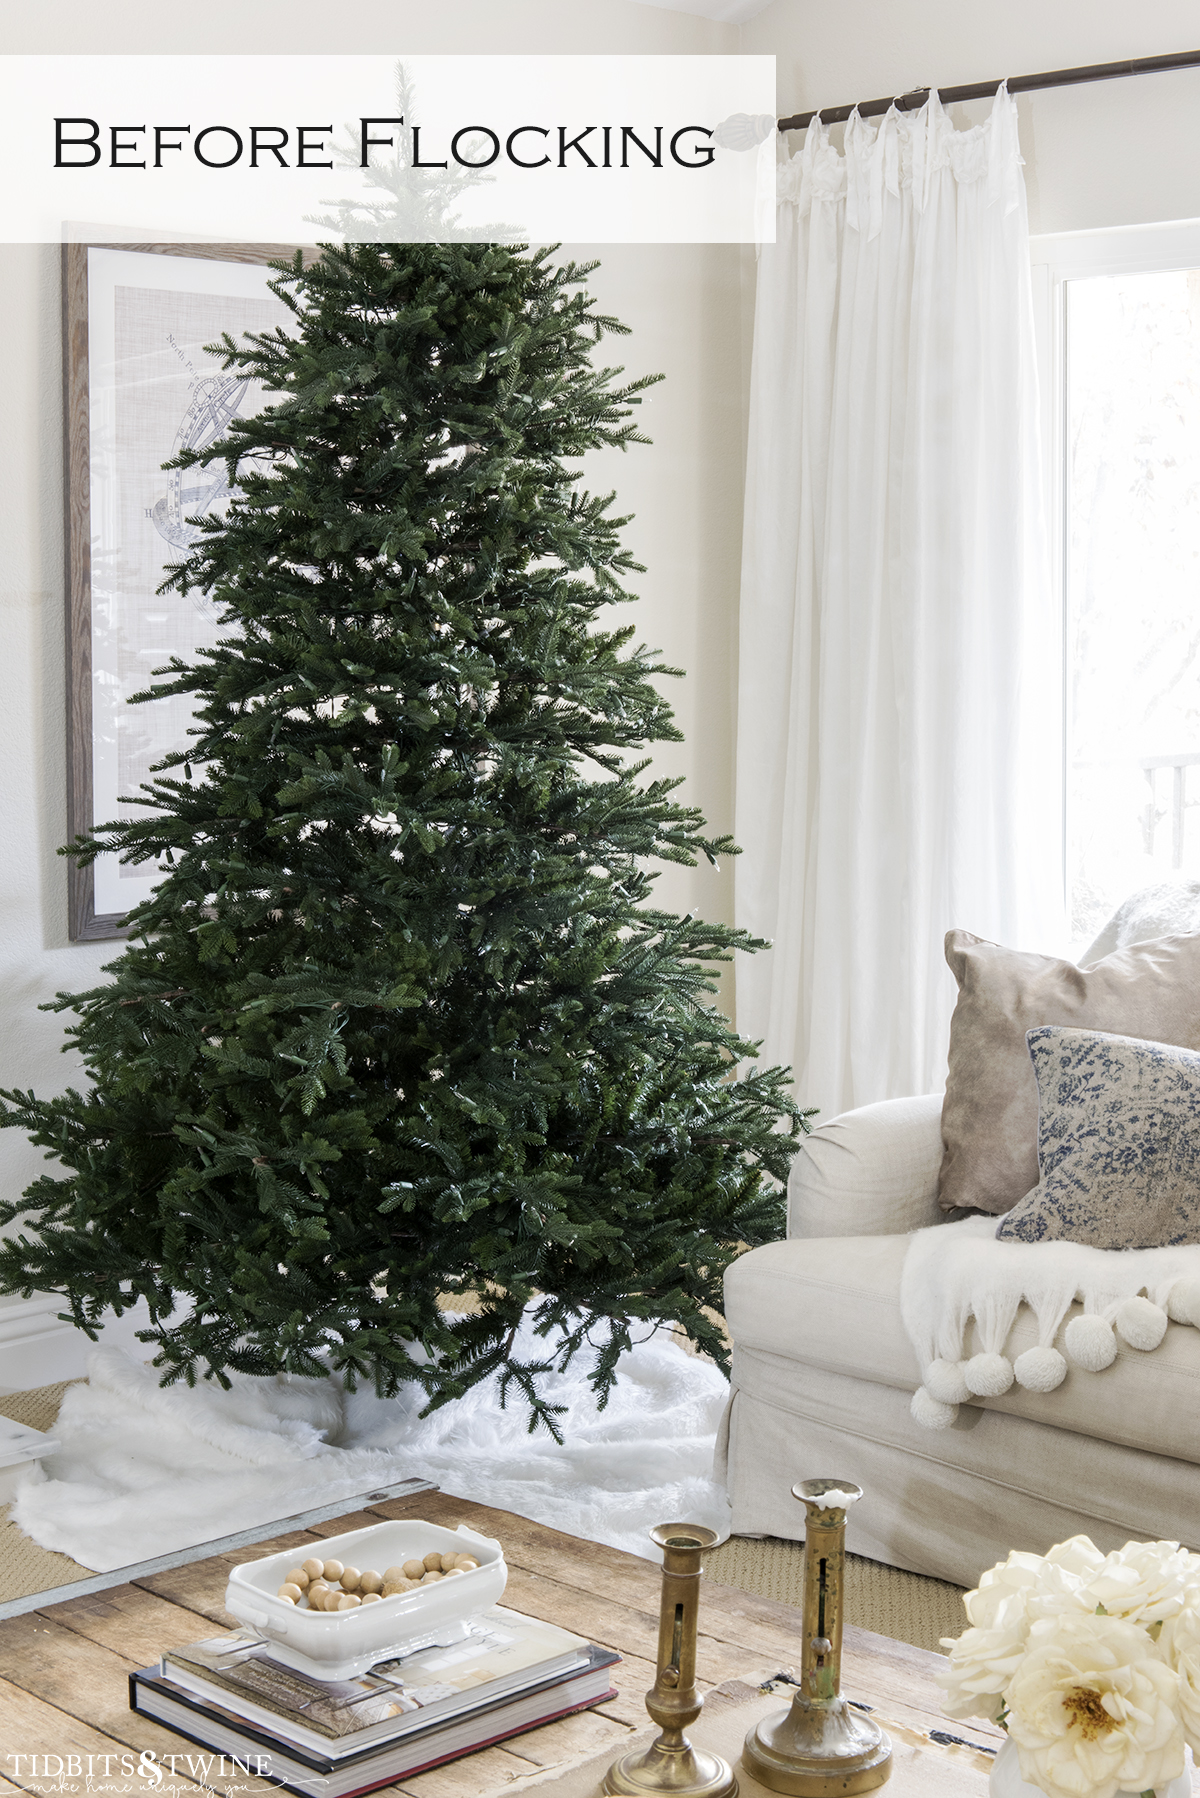
You can flock both real and fake Christmas trees. If you’re flocking an artificial tree, make sure to assemble and fluff it before starting the flocking process. Ideally, you want all of the branches bent and styled exactly the way you want them.
Fluffing first is necessary for two reasons. First, because you want to ensure that the flock sticks to the tops of the branches. Often after being packed away, some branches end up upside down. Second, you want to minimize touching and bending the branches so as not to knock flocking off, so you want them styled prior to flocking.
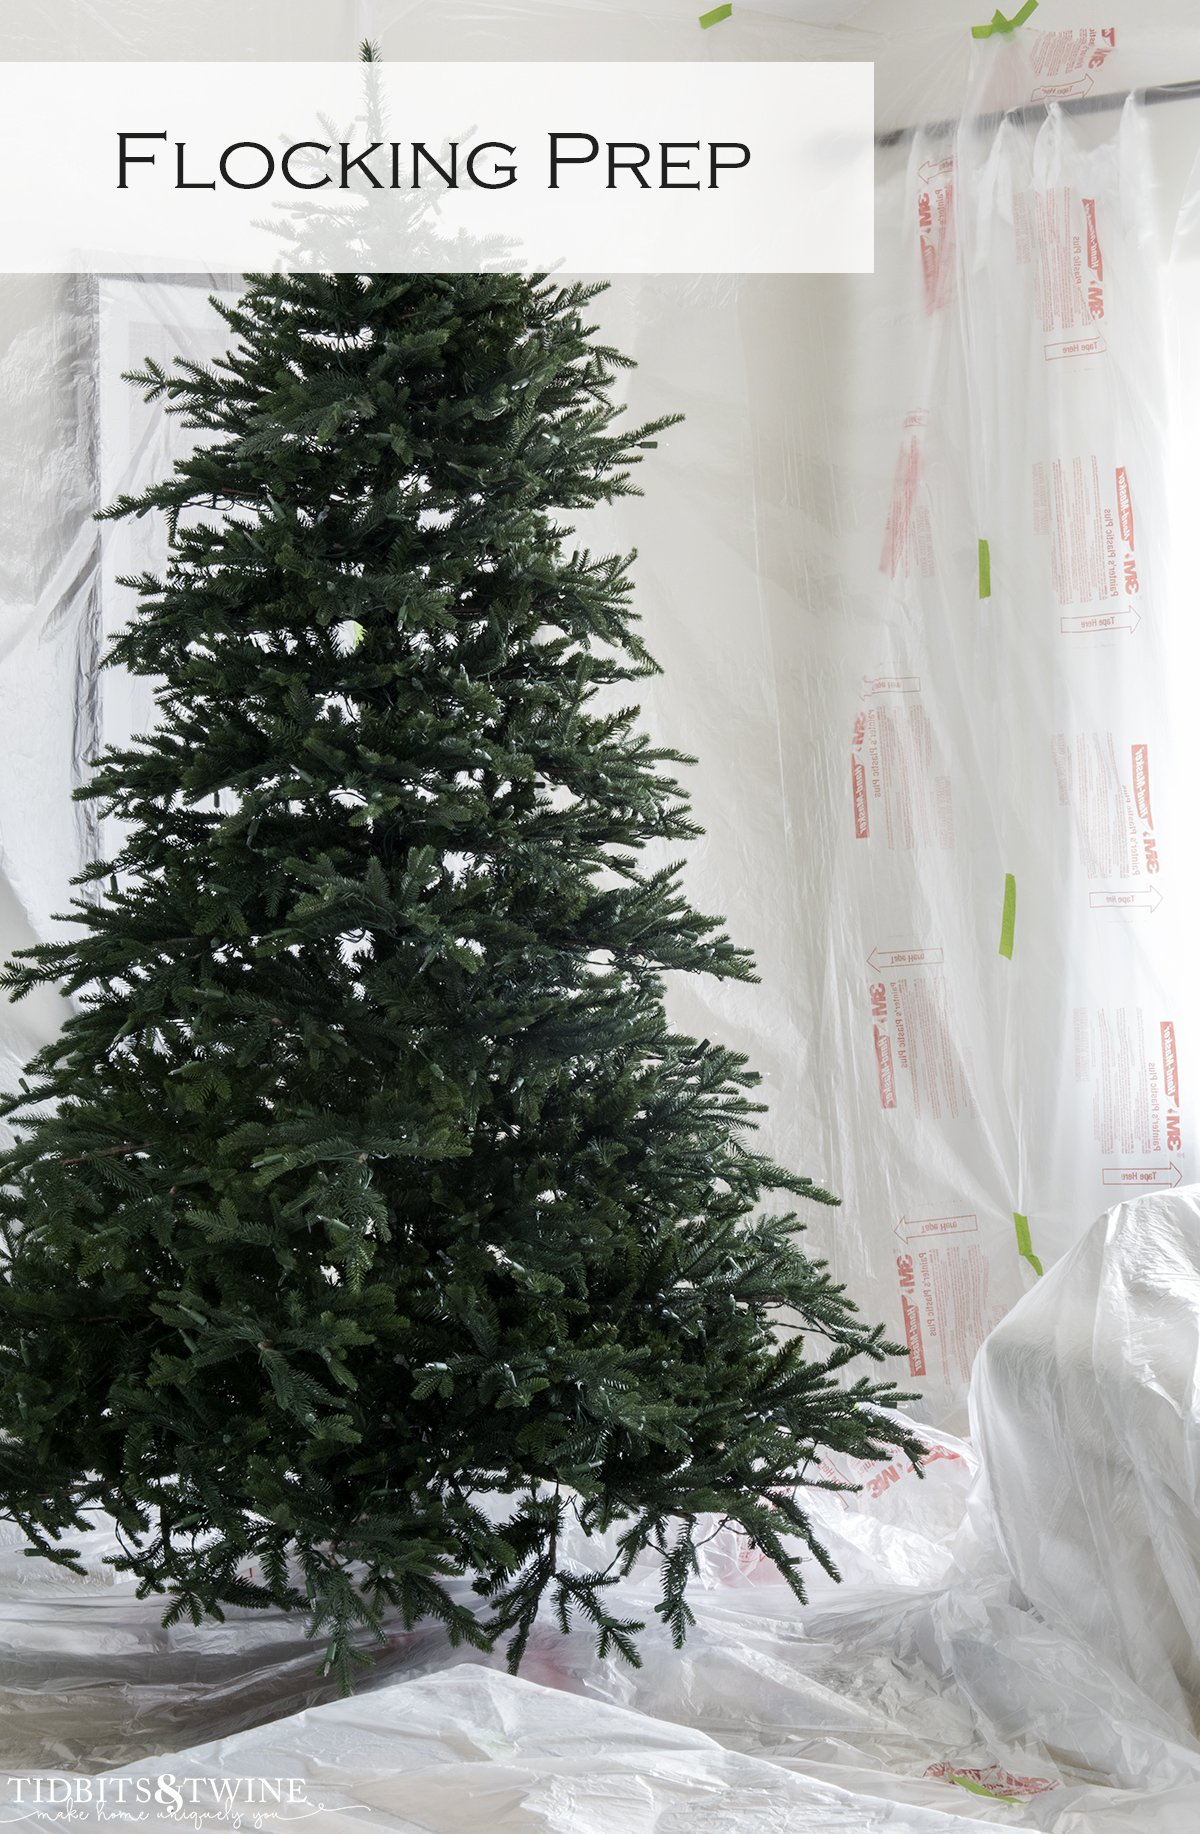
Step 2: Protect Your Surroundings
Ideally, flock your tree outside so as to avoid a mess. I only have a single front door, though, and I decided that by the time I wrestled my newly flocked tree through the front door, I’d knock most of the flocking off! And so, I decided to set it up in my living room.
I used this plastic sheeting to cover my walls, floor, and furniture. I like this sheeting because it sticks to itself so once it cascaded down the wall, I was able to stick it together and wrap it around the base of the tree.
Admittedly, the house temporarily looked like a crime scene! Lol!
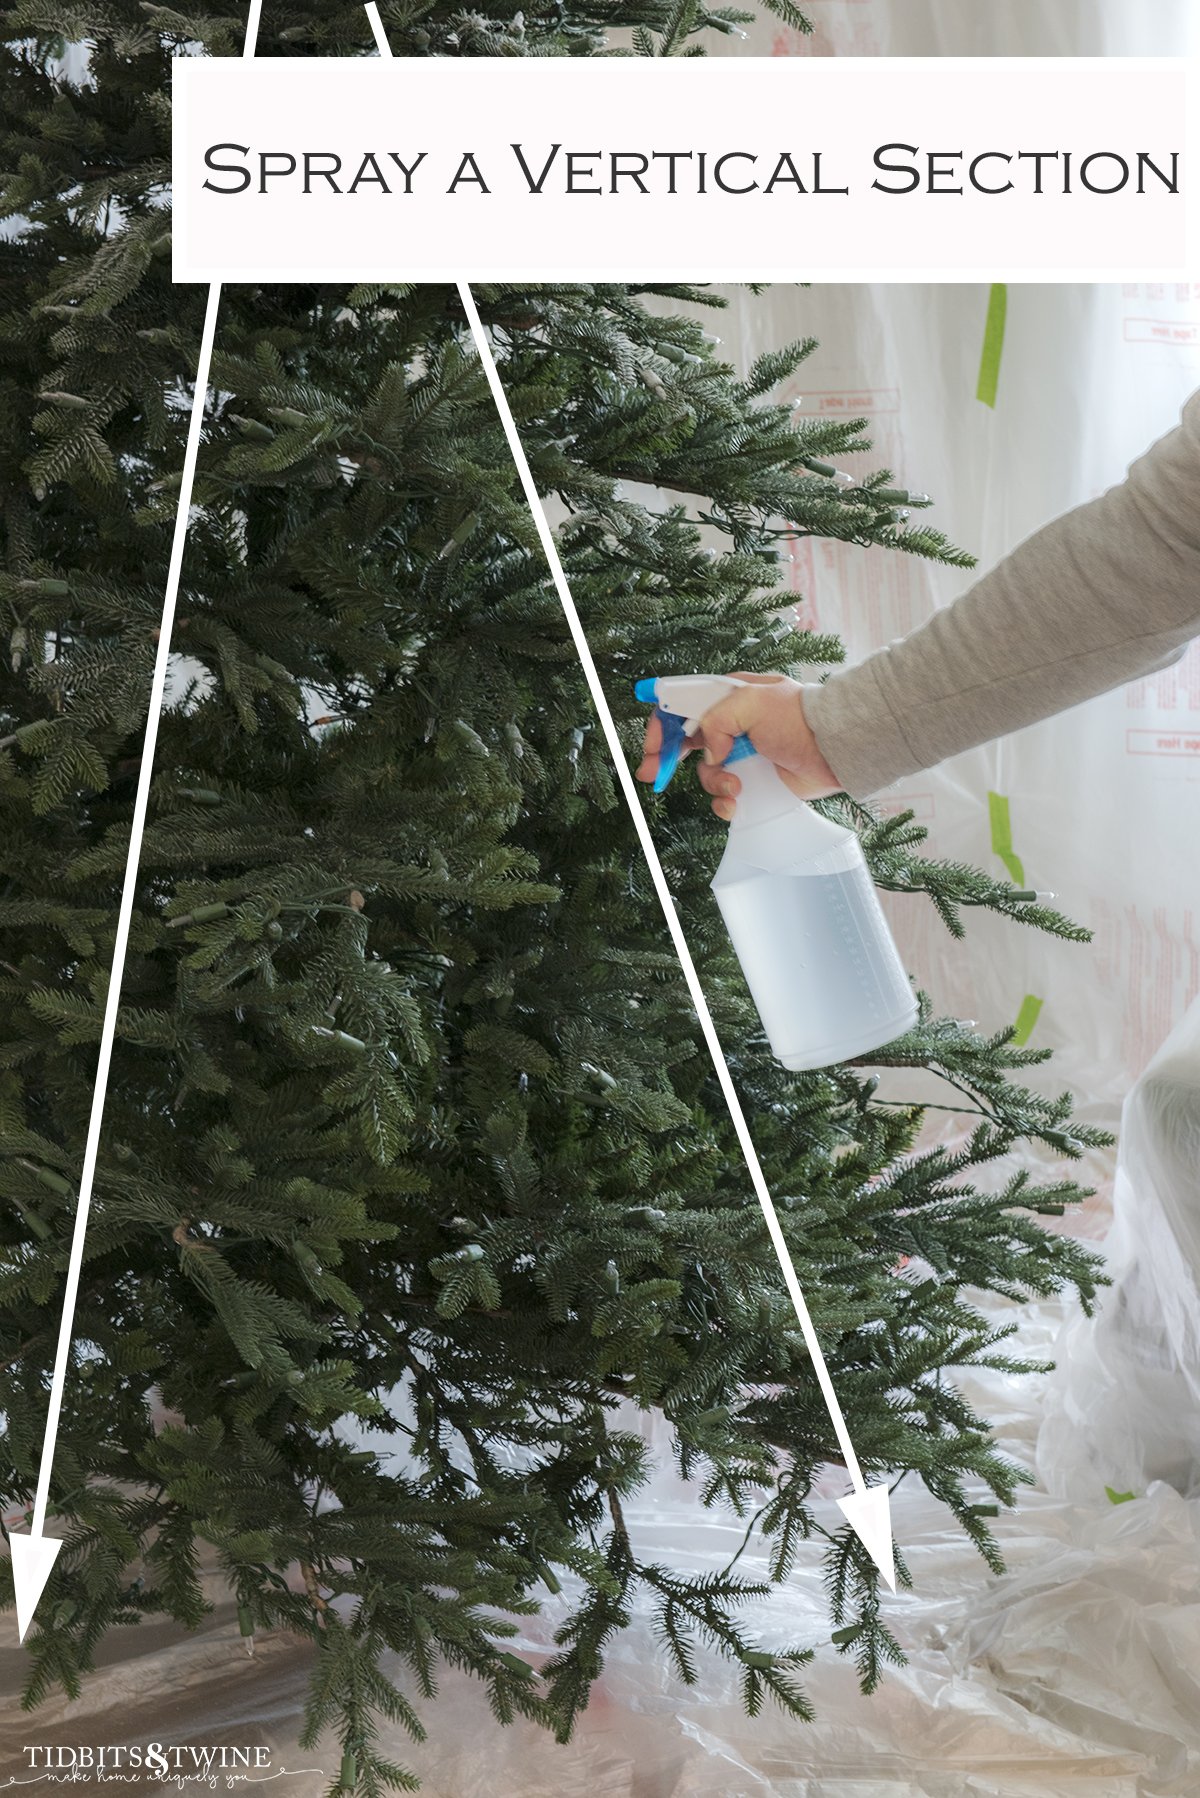
Step 3: Spray with Water
Starting at the top of your tree, mist all of the branches with water from your spray bottle. The branches should be wet but not dripping.
I found that it was best to mist in one large section at a time, from top to bottom. This is because as the flock falls down, it will stick instead of just falling to the floor. I mean, might as well put those little flakes to good use!
So think of your tree in triangular sections and spray one large triangular area at a time.
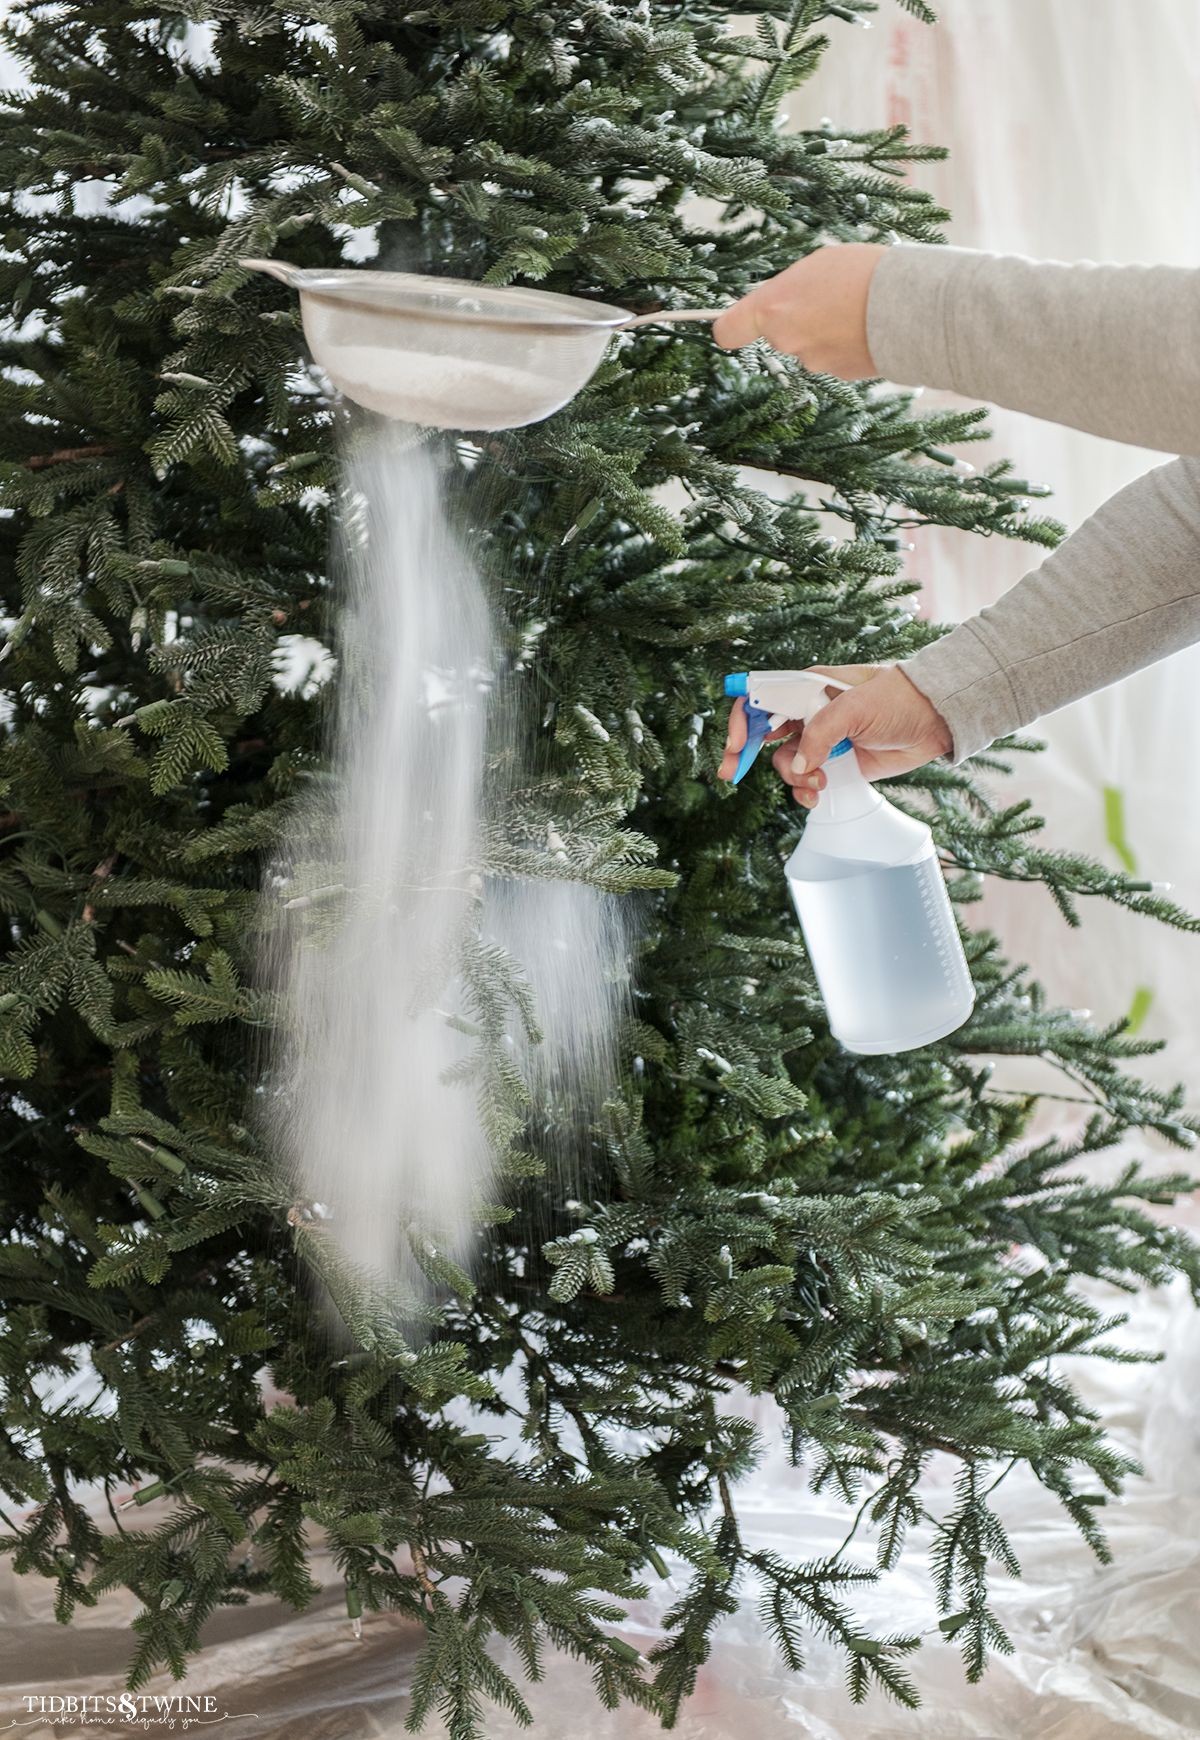
Step 4: Sift & Spray the Big Branches
Fill your large strainer no more than half full of flocking powder. Then, starting at the top of the tree, start shaking powder out of the strainer with one hand, while misting the flocking that’s falling with the other hand. The additional water will make the flocking stick.
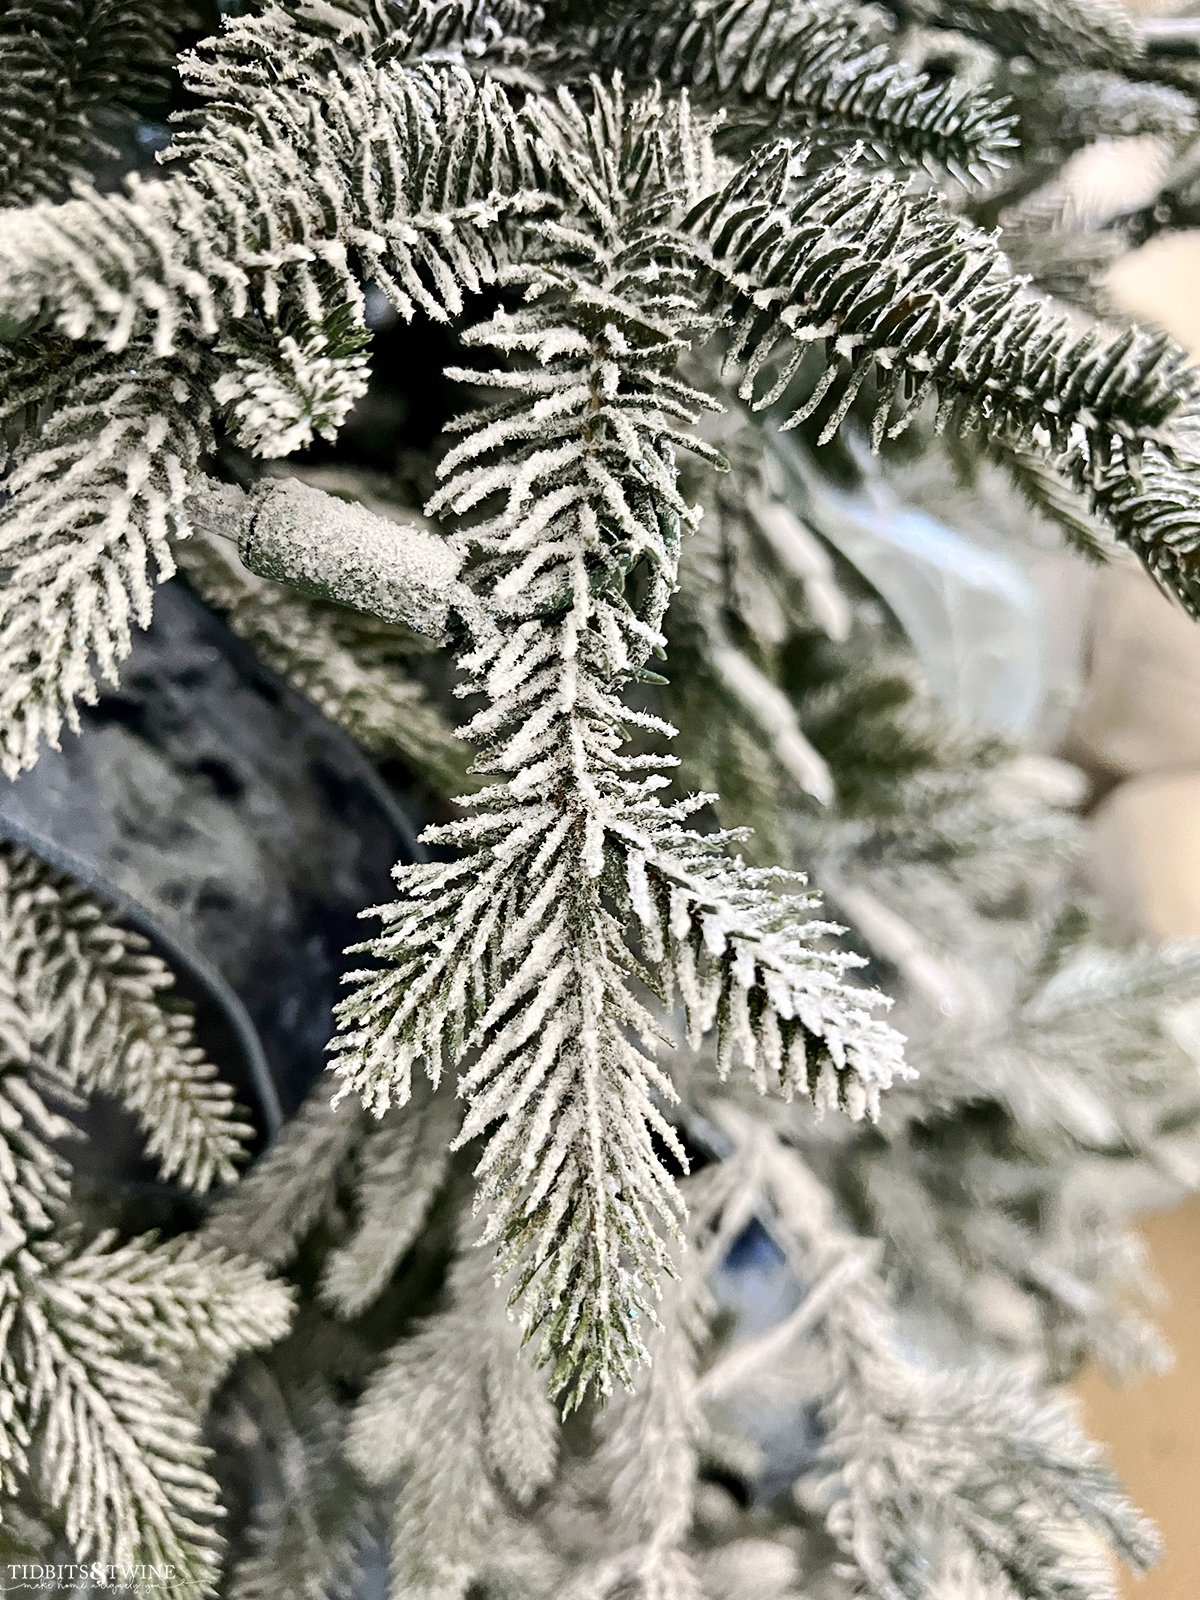
Sprinkle as much or as little as you’d like! I wanted a “light snow” effect and so didn’t completely cover the branches. I also did more at the top and more out the outer edges, which I thought was more true to how snow falls in nature.
Be sure to keep the spray bottle well below the sifter because if you accidentally spray the sifter, you will clog it! Sprinkle the flocking powder down the entire section that you previously wet.
Step 5: Sift Any Empty Spots
Not all trees will have this issue, but on my particular tree, the branches are very uneven. Some stick out much further than others! So as I started at the top and flocking fell down, it missed entire sections that were recessed a bit.
Whether you have this same issue or whether there are just areas that you missed that you want to cover, you can use a small sifter to evenly fill out the flocking.
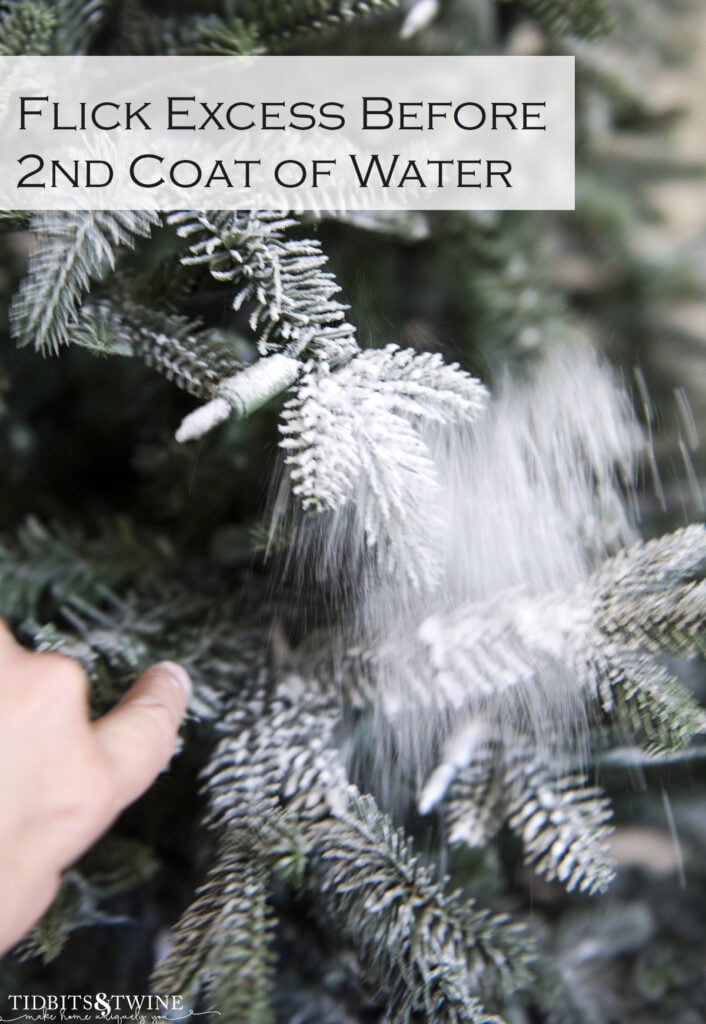
Simply wet the branches you want to cover and using your small sifter, sprinkle a bit more flocking. Skip misting while flocking when doing these detailed areas or you’ll end up with branches below that have thicker flocking because they’ve basically been flocked twice. (See Tips below for more on this)
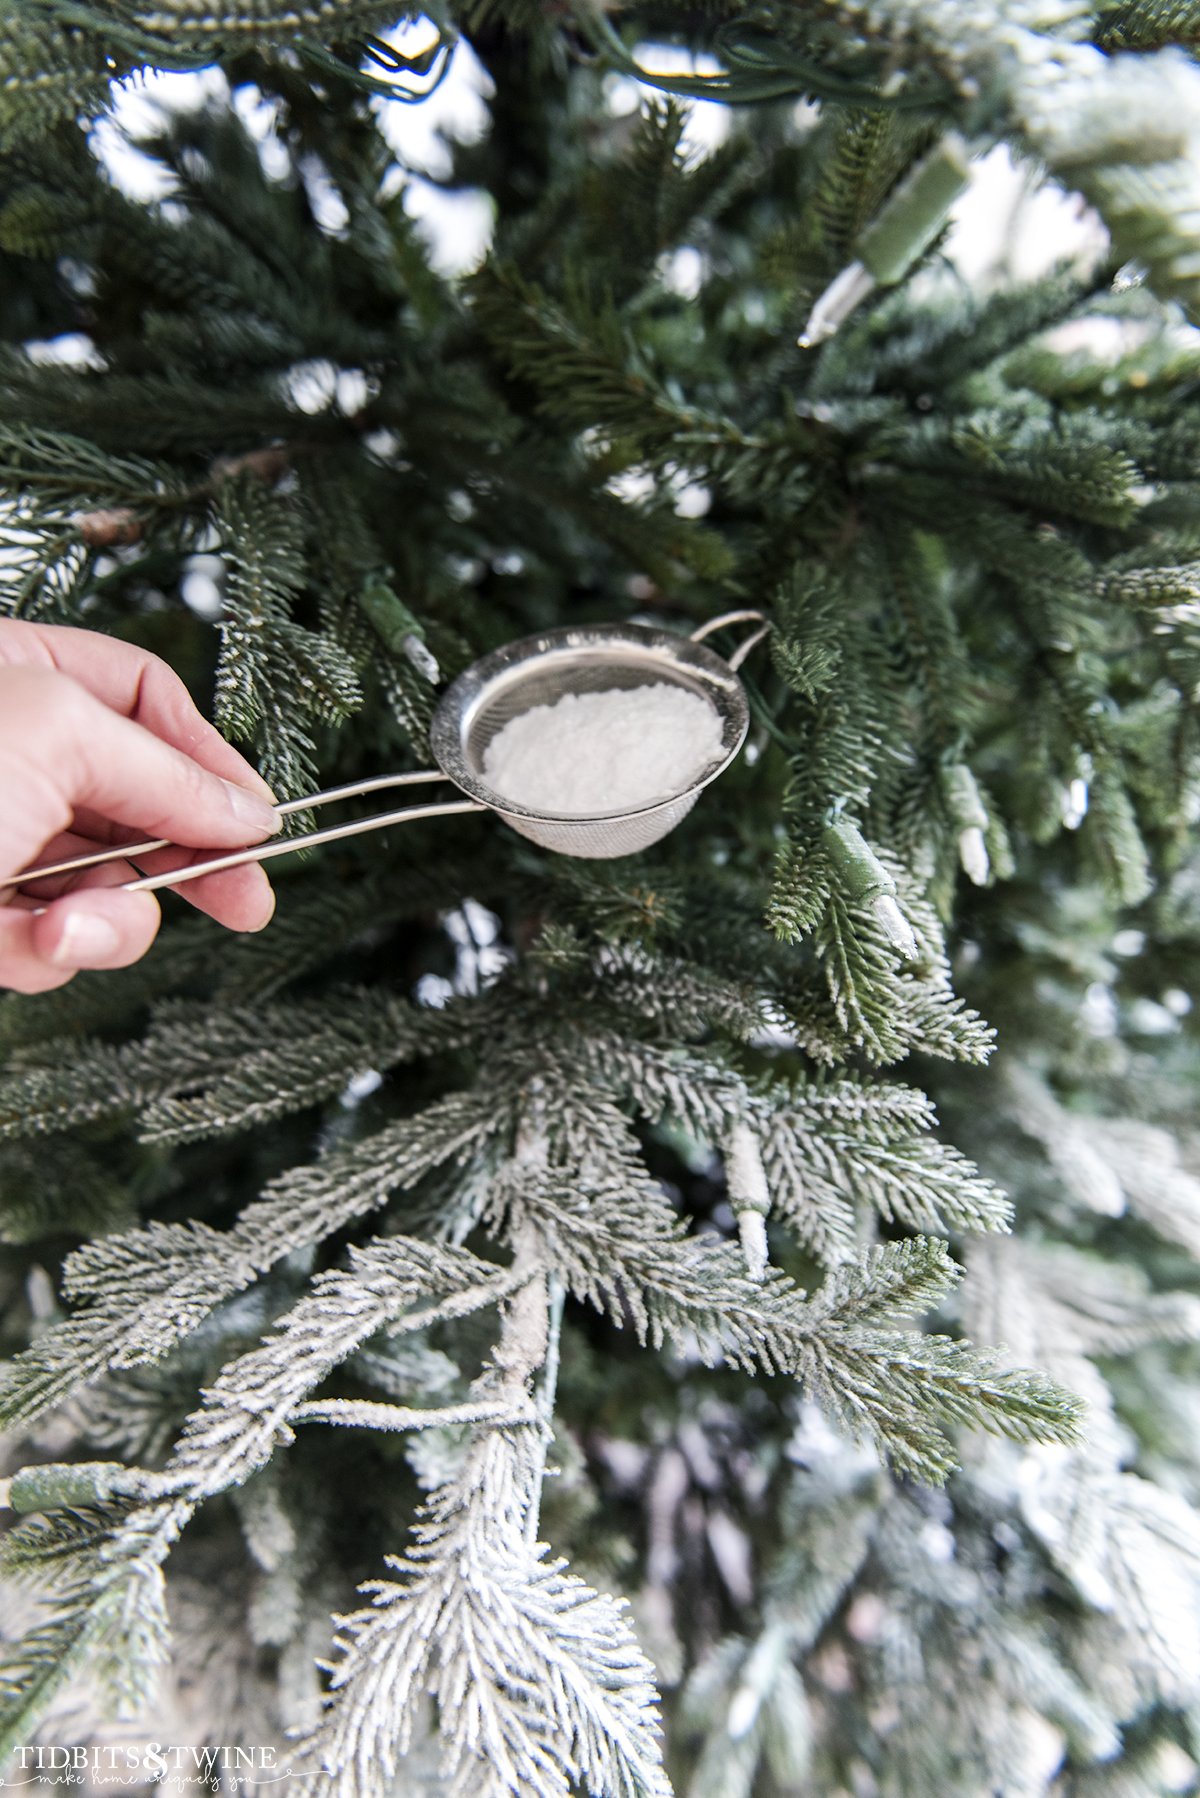
This is where you’ll need to put your Type-A personality in check, though. Not every branch needs to be perfect. Not every branch needs to be identical! Remember, you’re trying to mimic nature so think about how snow actually falls.
Step 6: Final Misting & Drying
When you have all of your flocking in place and are happy with how your tree looks, mist the entire tree to “glue” the flocking onto the branches. It’s this final coat of water that secures the flocking powder to the tree. The entire flocking process took me about 45 minutes.
You need to allow your tree to fully dry before you can start decorating. The package says 24-72 hours. Since I did just a light flock, I checked my tree after 24 hours and it was dry. I’m so happy with its new light snow appearance!
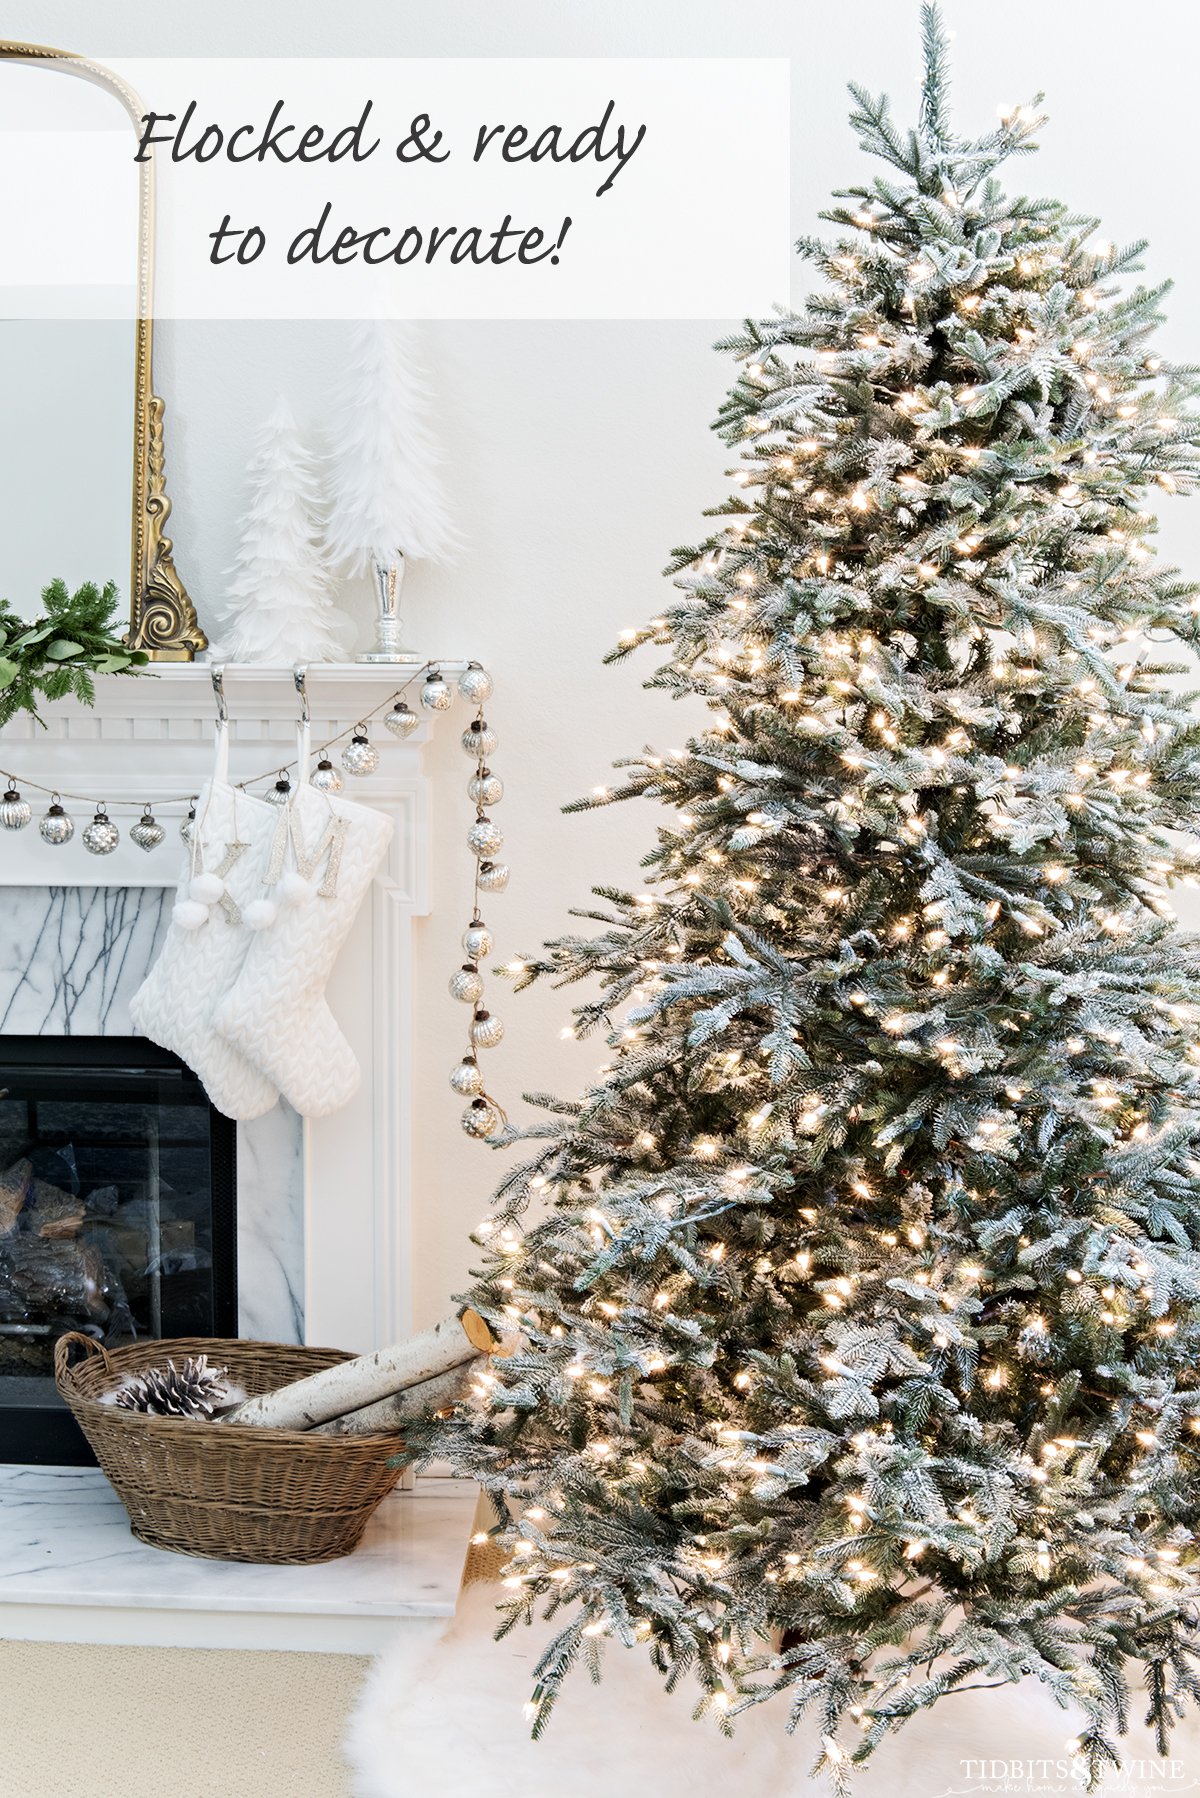
Decorating the Flocked Tree
I try to do something totally different each year, even though I’m using the same tree. This year, I decided to use multiple ribbons tucked into the tree. My main ribbon is a smokey blue velvet, and then I have a sheer blue with silver, and a sheer gray.
I’m using all neutral-colored ornaments this year. Just silvers, golds, and white.
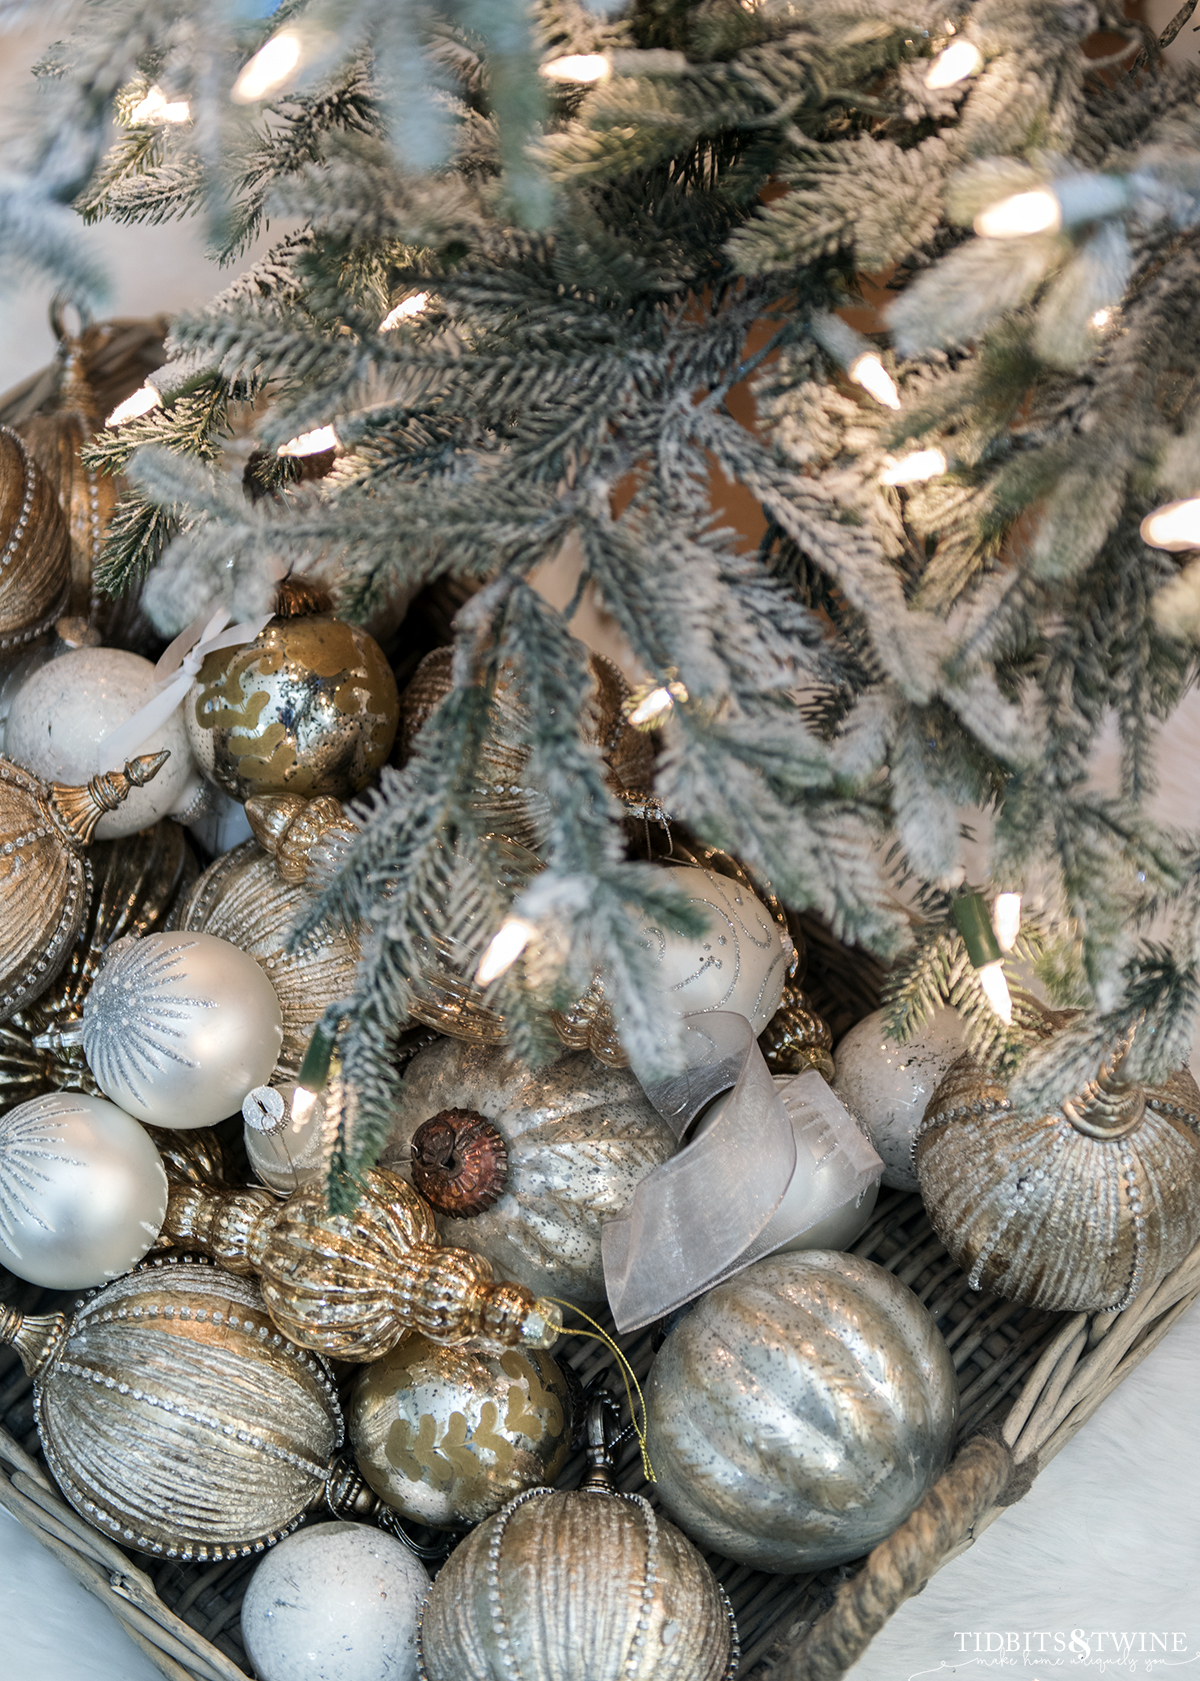
Here’s a peek at how it turned out…

I’ll be sharing more pictures and details soon so stay tuned!
Additional Tips & Tidbits
Here are some expert tips to ensure your flocked tree comes out perfect!
- When shaking the powder in the strainer, shake up and down, not side to side. Side to side tends to allow some powder to fall out over the edge and create clumps.
- Use your dominant hand for sifting. You’ll find you have much more precision.
- When filling in with additional flocking powder, you might spill some powder down below that you don’t want. If this is the case, simply use your finger to flick the branch and release the excess powder. Once you spray with water, though, the powder will be set.
- Ensure your HVAC system is off so you don’t inadverntantly blow flocking powder around if it kicks on while you’re working.
- For a natural look, put more flocking powder at the top and on the edges.
- Don’t try to smear or wipe away flocking powder because it’ll create a sticky mess.
- If you accidentally spray your sifter with water and it clogs, you can use a stiff brush to scrub the sifter. I used a potato brush because that’s what I had on hand! Only wash the sifter to clean it if you plan to fully dry it before continuing with flocking.

How to Flock a Christmas Tree the Easy Way

Sharing the easy and efficient way for how to flock a Christmas tree so that it looks natural and beautiful! Follow these simple step-by-step instructions to flock your own tree plus my tried-and-true tips to make it even easier for you!
Materials
Tools
- Mesh strainers - Have a least two sizes on hand. Mine were from HomeGoods but this set is almost identical.
- Bowl - You'll need this to put your strainer in so that you don't spill flocking powder
- Spray Bottle - A small bottle will work, but larger is better so that you don't have to refill
- Mask - No need to breathe in the flocking powder!
- Plastic Sheeting - Optional but necessary if flocking indoors
Instructions
- Assemble and Fluff - If you're flocking an artificial tree, make sure to assemble and fluff it before starting the flocking process. Ideally, you want all of the branches bent and styled exactly the way you want them.
- Protect Your Surroundings - especially if flocking indoors
- Spray with Water - Starting at the top of your tree, mist all of the branches with water from your spray bottle. The branches should be wet but not dripping.
- Sift & Spray Your Big Branches - Fill your large strainer no more than half full of flocking powder. Then, starting at the top of the tree, start shaking powder out of the strainer with one hand, while misting the flocking that's falling with the other hand.
- Sift Empty Spots - Simply wet the branches you want to cover and using your small sifter, sprinkle a bit more flocking. Skip misting while flocking when doing these detailed areas or you'll end up with branches below that have thicker flocking because they've basically been flocked twice.
- Final Misting & Drying - Once done, give the entire tree a coating of water mist. You need to allow your tree to fully dry before you can start decorating. The package says 24-72 hours.
Notes
- Always take proper precaution to protect yourself and your surroundings before starting any project.
- When shaking the powder in the strainer, shake up and down, not side to side. Side to side tends to allow some powder to fall out over the edge and create clumps.
- Use your dominant hand for sifting. You'll find you have much more precision.
- When filling in with additional flocking powder, you might spill some down below that you don't want. If this is the case, simply use your finger to flick the branch and release the excess powder. Once you spray with water, though, the powder will be set.
- Ensure your HVAC system is off so you don't inadvertently blow flocking powder around if it kicks on while you're working.
- For a natural look, put more flocking powder at the top and on the edges.
- Don't try to smear or wipe away flocking powder because it'll create a sticky mess.
- If you accidentally spray your sifter with water and it clogs, you can use a stiff brush to scrub the sifter. I used a potato brush because that's what I had on hand! Only wash the sifter to clean it if you plan to fully dry it before continuing with flocking.
Questions About Flocking a Tree
Can You Flock a Pre-Lit Tree?
Yes, you can! The flocking powder packaging actually states that you can flock a pre-lit tree with UL lights, so make sure to check your holiday lights first. Always make sure that they are off and unplugged when flocking and don’t plug them in again until the tree is fully dry.
Remember, you are misting the tree, not soaking it.
How Much Flocking Powder Do You Need?
The amount of flocking powder you need depends on the size of the tree and how heavily you want it flocked. The powder I used comes in both a 2 lb bag and a 5 lb box. The 2lb bag states that it can moderately flock a 7 ft tree. My 7.5ft tall tree has light flocking and I have about 3/4 of a bag left.
Does Flocking Dim the Lights?
Maybe a little but to me, the difference is so small it’s negligible. The flocking on the branches glows nicely with the lights, though, so I feel like it makes up for any difference in the bulbs themselves. You could use painter’s tape to tape off all of the lights before you start if you really want to avoid getting powder on the bulbs.
Is Flocking a Tree Messy?
Honestly, it’s not too bad! If you are flocking outdoors, avoid a windy day. Indoors, so long as you have protected everything, the excess flocking powder will fall down onto the plastic. As you mist your tree with water, the flocking on the ground will get wet and will get sticky. For this reason, I wore socks for this project so that I could easily take them off if ever I had to leave the room. I didn’t want to track sticking flocking through the house!
Any dry powder that lands on the floor can easily be vacuumed up. Any bits that fall off and are dry can also be vacuumed.
Does Flocking Fall Off?
Once it has its final coat of misting and has fully dried, the flocking won’t fall off when you touch it; however, after you pack it away and pull it out again the next year, expect to do some touchup. The flocking can be scraped off a bit when you’re applying ornaments and ribbon, but you can’t ever fully take it off and start from scratch. Once you flock your tree, it will always retain some flocking.
Can More Flocking Be Added?
Yes! At any time, you can go back and repeat the steps above if you notice a missed spot or just want to add a heavier look of snow. Just remember that once you wet flocking on a branch it’s stuck. So carefully look over your tree before you give it its final misting.
Does Flocking Come out of Clothes?
Yes it does! I had sticky flocking on the bottoms of my socks and somehow managed to get a patch on the knee of my favorite sweat pants. I threw them into the wash and just laundered them normally and all of the flocking came off.
More Christmas Decorating Ideas
- A Pretty Christmas Tablescape in the Dining Room
- My Favorite Christmas Inspiration
- My Christmas Living Room Tour: Soft Pinks


Join the Community
Let’s keep in touch! Get exclusive artwork plus the latest news delivered directly to your Inbox!
Your tree looks absolutely beautiful…..this is something I am going to try 🥰