
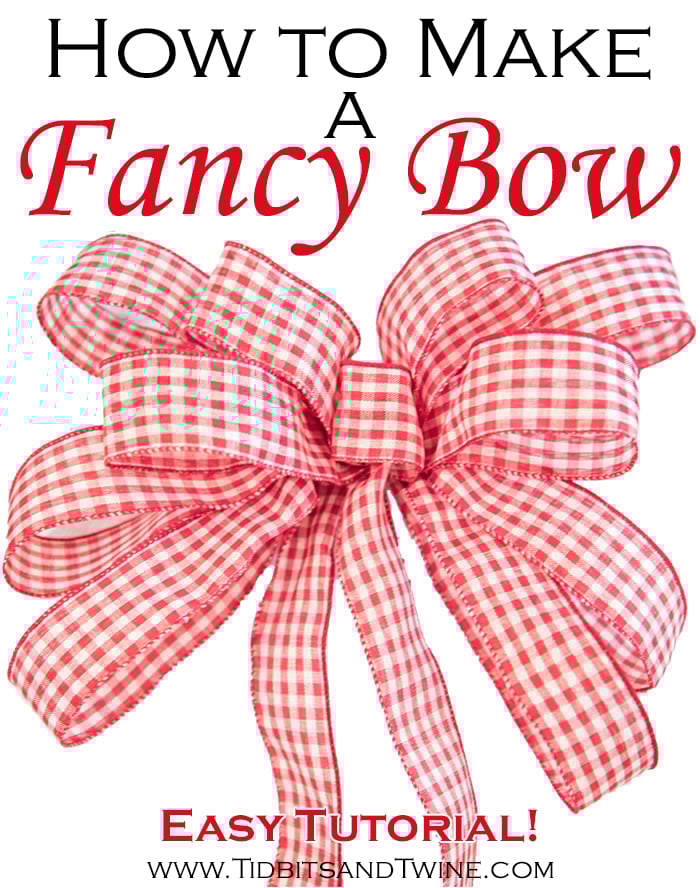
Here’s how to make a bow for wreaths, tree toppers, packages, and more! Don’t buy those expensive bows when you can easily make one yourself with just ribbon and wire!
UPDATE: Many have asked for a video tutorial for making the bow and I’ve just added one! Scroll down for step-by-step bow instructions AND a complete video tutorial. Make sure your volume is on!
I don’t know about you, but for whatever reason, no matter how hard I try to carefully store a wreath after the season, the next year, it doesn’t come out of storage looking quite as good as when it went in. So now, I just use one wreath for all seasons, which helps to keep it nice year-round and is a less expensive alternative versus buying multiple wreaths!
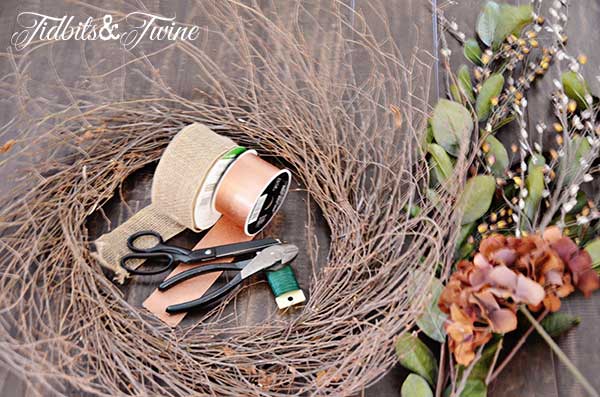
I purchased a bare twig wreath from a local craft store to use as the base (you could also use a grapevine wreath). On sale, it cost just under $14. For each season, I just wire on different accent pieces to create a new look. For fall, I picked up some faux berry stems and pussy willow branches (on sale for 50% off plus I used a 20% off coupon) and also used two different ribbons that I had on hand.
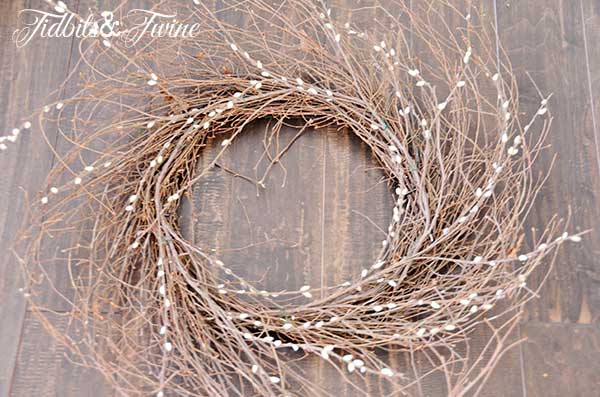
I first wired the pussy willow all the way around, making sure that I kept it facing the same direction as the twig wreath.
Next I wired the berry stems onto the wreath. I took a picture of this step to show you, but didn’t take the time to check my photos in between each step and afterward, realized that some of them were so blurry that I couldn’t share them! You’ll have to use your imagination as to what it looks like with the berry stems wired on top of the pussy willow.
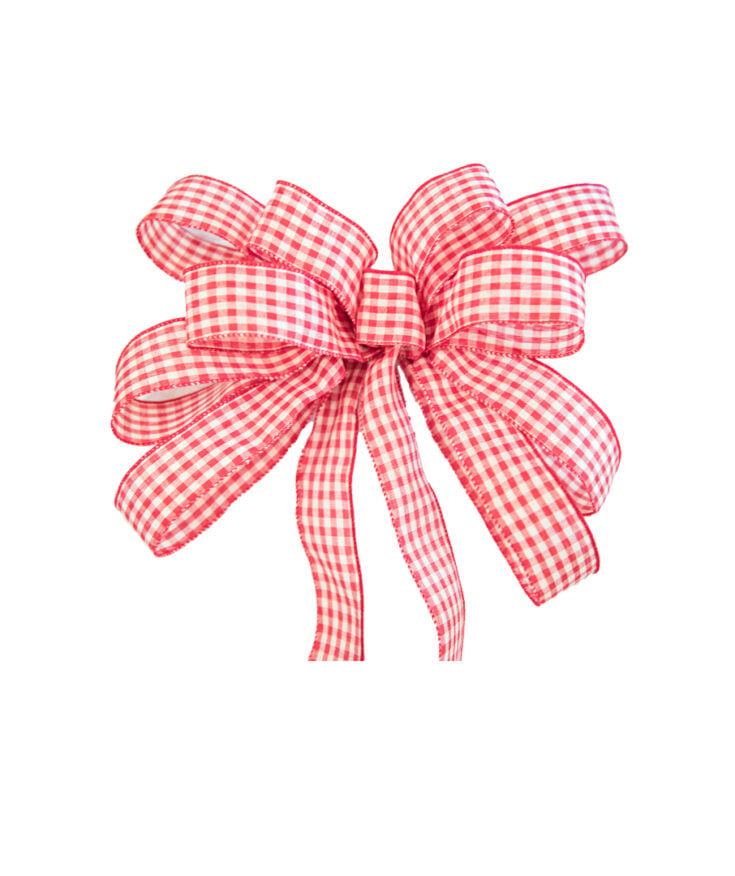
I then decided to add a wire burlap bow to the bottom center of the wreath. The next steps will show you how to make a bow for a wreath. This technique will work with any type of ribbon, although wire is preferable so that it will hold its shape. Looking for similar burlap ribbon? You can find it on Amazon HERE.
How to Easily Make a Bow for Wreaths and More!
Here’s how to make a bow for wreaths, tree toppers, packages, and more! Don’t buy those expensive bows when you can easily make one yourself with just ribbon and wire!
Materials
- Wired ribbon
- Wire
Tools
- Wire cuter
Instructions
- Start with the Tail - Hold the ribbon in your hand and leave a tail long enough to work as one end of your bow plus the length you’ll need for the center loop. When in doubt, leave more! The tail should be in the front of your hand.
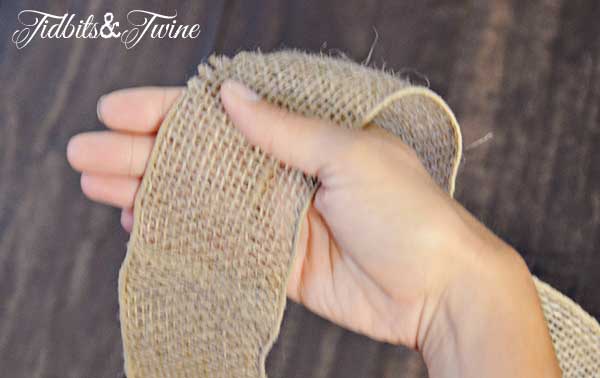
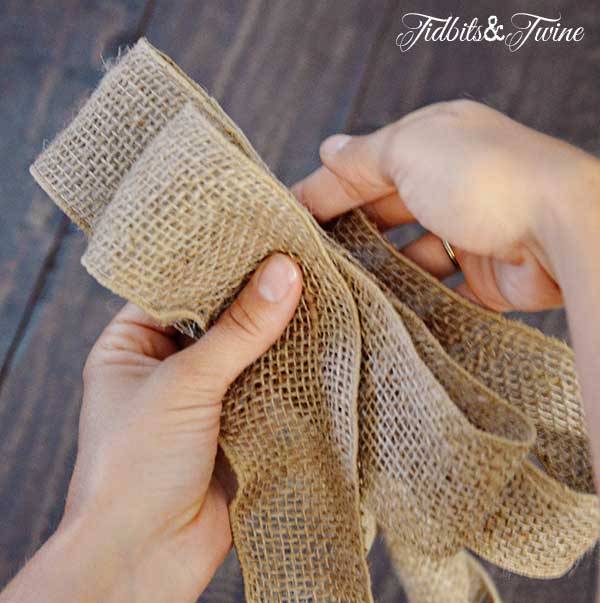
- Create 1st Loop - Fold a length of ribbon backward to create a loop and pinch with it your thumb. This loop will be the smallest (inside) loop on the left side of your bow. The tail of your bow will continue to hang down in front.
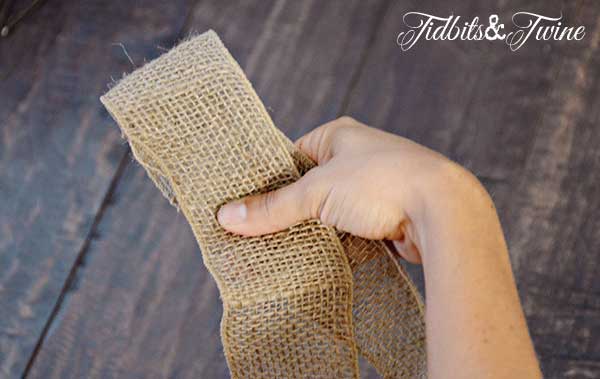
- Fold to Create Second Loop - Fold another loop backward on the other side that matches in size to the first loop. This will be your smallest (inside) loop on the right-side of your bow, so you want the two sides to be even. Each loop thereafter will get progressively bigger. Note: if your ribbon is one-sided, be sure to twist after each loop so that the good side always faces out.
 You should now have two matching loops, one on the left and one on the right. The tail is still hanging down in the front.
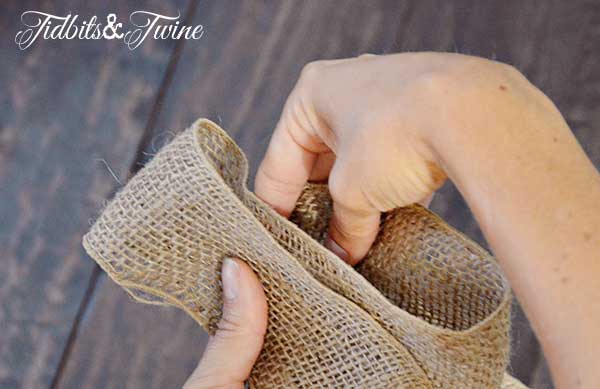
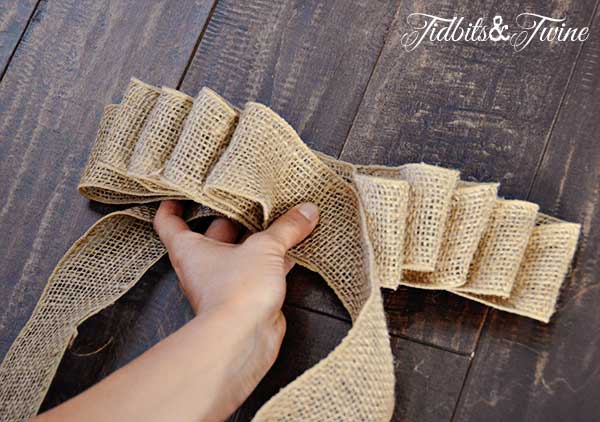
- Continue Creating Loops - Continue making loops on the back alternating from the left to the right. Remember that each loop should be a bit bigger than the one before it.
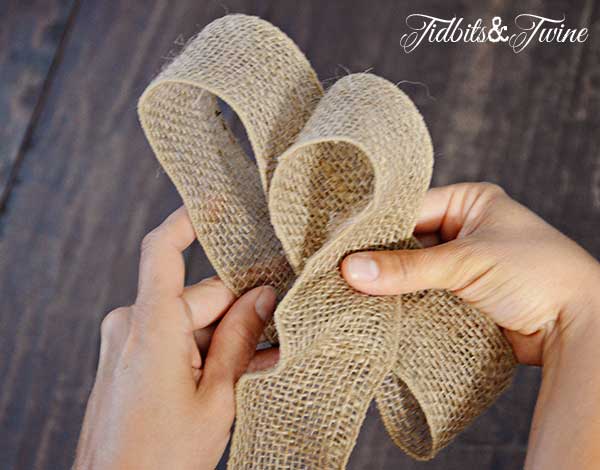
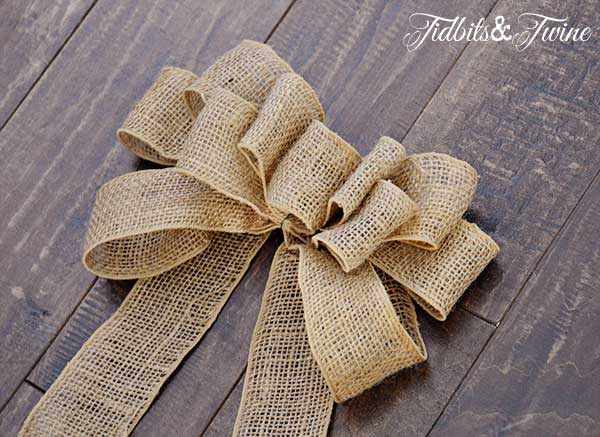
- Finish with an Odd Number - When you have reached your desired size, you are ready to finish it off! The number of loops you create and the size of the loops will depend on the size you want for your finished bow, but regardless, always use an odd number of loops on each side. Here you can see that I have five loops per side going from smallest to biggest and one tail of the bow is on the front and the other (still attached to the spool) is on the back.
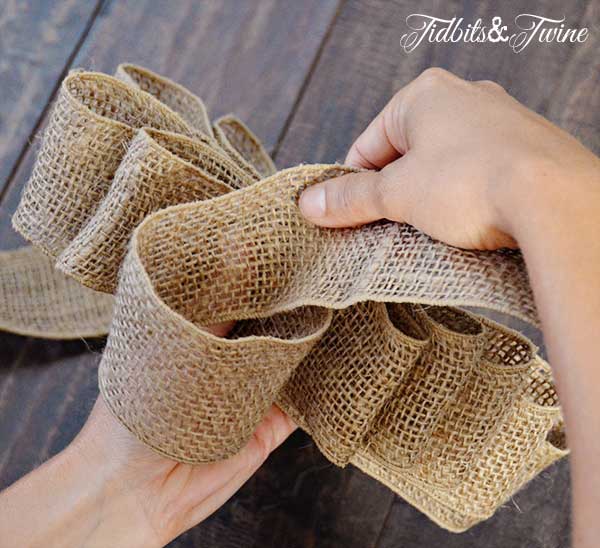
- Create Center Loop - This one was hard to photograph, so I’ll do my best to explain! In this step, you’ll be creating the center loop of your bow. Take the tail end that is on the front and create a backward loop with the tail end now going down over the top of the bow to the back.
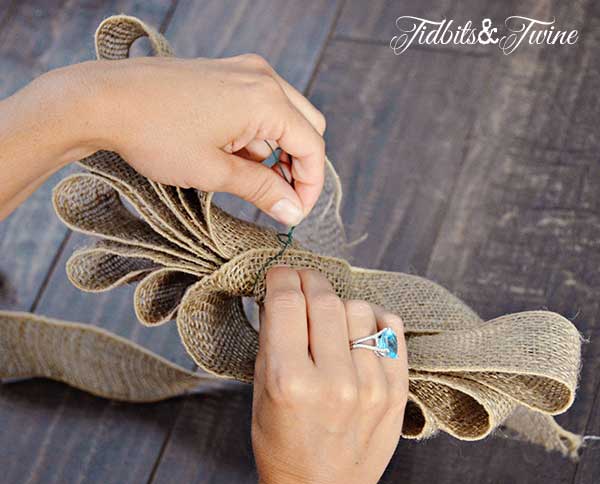
- Secure with Wire - To secure the bow, use a length of wire that is twisted around the back. Wire is ideal because it hold securely, but also allows you to move the loops around to spread out the bow when you’re ready to fluff it. A twist tie works, too!
- Fluff and Finish - Now you’re ready to fluff! For this, all you need to do is pull the loops alternating up and down so that each one is visible. I tend to like the biggest loops on the back to come down toward the tail of the bow, as shown below.
Notes
Use your bow for wreaths, tree toppers, packages, and more!
Need more help? Watch the tutorial here:
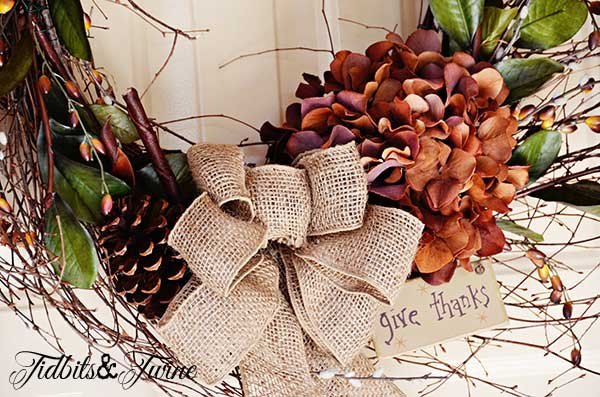
Whew! Now that the bow was made, I was ready to finish the wreath. I added the head of a faux hydrangea, some pinecones, and a small fall sign.
Everything is wired – not glued – so that for winter, spring and summer, I can just remove these elements and add new ones. I find that it’s much easier to store faux stems than entire wreaths, plus they are less expensive to buy.
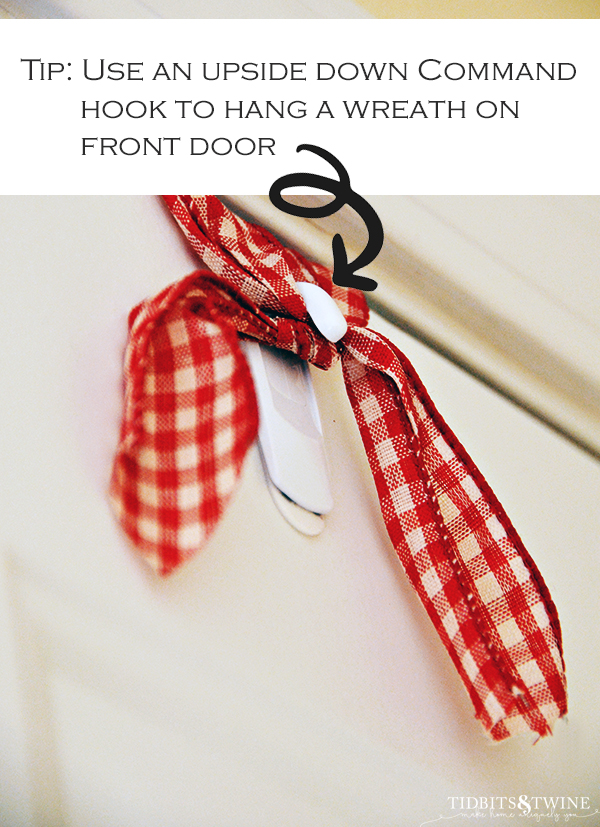
Tip: Here is a great and easy way to hang a wreath on the front door! Simply turn a Command hook upside down on the inside of the door to hold your wreath. I prefer this over a wreath hanger because the hangers always clanged against my door whenever we shut it, but now it is silent and the wreath is firmly in place!
More Decorating Tips
- Interior Design Style Quiz – What’s Your Home Decorating Style?
- Simple Fall Ideas for the Kitchen
- Easy Fall Decorating In the Family Room
- Learn How to Decorate a Mantel in 3 Simple Steps
- Marble Tile Bathroom – My Experience with Care and Maintenance 2 Years Later

Join the Community
Let’s keep in touch! Get exclusive artwork plus the latest news delivered directly to your Inbox!
By far the BEST bow tutorial I have seen! FINALLY! Whew!
Yay! Thank you, Amy!
Thanks for a clear, easy to follow set of instructions! I am making some last minute Christmas decorations. I haven’t made bows in several years, but your instructions helped every come out beautifully.
I’m so glad that these worked for you!
I followed your bow instructions today and it turned out great! Thanks for sharing them!
I’m so glad that they worked out for you! Thank you for letting me know! :)
very cute…. thank you
Thanks!
That’s a stunning wreath. I was searching for directions on how to tie a wreath bow, and your directions seem easy to follow. I haven’t tried it yet! Even if I don’t make a bow, I’m glad I found your blog. It’s lovely.
Thank you so much and good luck with your project!!
Love your wreath & want to give it a try. Regarding the ribbon for your bow, what would I ask for in order to find this type of ribbon? Thanks!
Hi Barb – On this particular wreath I used wired burlap ribbon in the natural color that is 2.5″ wide. This is a pretty common type of ribbon at the major craft stores, especially during this time of year, so you should be able to find it relatively easily. If not, Amazon also sells it. I also wanted to let you know that you can make the bow out of any type of wired ribbon, it doesn’t have to be burlap, but I will say that the wider the ribbon is, the more substantial the bow will look. Hope this helps!
how many feet of ribbon gives you what size a bow… Just need a ballpark.. I assume it depends on how many loops and how big you make them…. But for this burlap bow, in particular, how many feet got you what size bow?? Thanks! I’m about to decorate my church’s sanctuary and bought 5yd rolls of red burlap (unwired) 6 inch wide ribbon… Wondering how far they will get me!! Thanks! And because of your post, I may just try to make them myself!
Hi Ashley – I had previously estimated about 4′, but I just realized that’s for a 3 loop bow and the one I used in the tutorial is a 5 loop bow, so it takes a LOT more ribbon. You’re right that the length used depends on how many loops and how big you make each loop, but the one in the tutorial is big and used about 10′. Hope that helps!
That’s such a beautiful wreath and such a good idea to wire the items in so that you can reuse it each season. I used it as the inspiration for my first Fall wreath. Thanks for the great ideas! Here’s a link to mine. I guess it’s OK for a first try!
http://www.thechicdream.com/2013/10/my-first-wreath.html
Hi Melissa – Thank you so much for sharing! I love your wreath and think you did a great job! And wow….that house and porch! So charming! Thank you for linking and dropping me a note to share your wreath. Have a great week!
Thank you for the tutorial. Especially the bow, I’m always rotten with that.
Your wreath is simple and not over done.
Thank you, Kimberly!
Hi Kim. I just saw your feature on Dwellings. Such a pretty wreath and thanks for the bow making directions. Mine always turn out differently so this will make it easier to do. Congratulations..Happy Monday..Judy
Hi Judy – Thank you so much for visiting me from Dwellings and taking the time to leave a comment! I really appreciate it!
This is gorgeous Kim. I love it! Congrats on being featured…..Christine
Thank you, Christine!
Your wreath is so pretty and delicate, and your tutorial for bow making is excellent! Thank you for the inspiration. Linda
Linda – Thank you so much! I’m so glad that you found the bow tutorial helpful.
Beautiful wreath, and a great ideal using the same wreath and changing it out, great tutorial on making a bow.
Sandy
Sandy – Thank you for visiting and taking the time to leave a comment!
Such a beautiful wreath! Thanks so much for sharing this how to with us and also for sharing at AMAZE ME MONDAY! Such a pleasure having you…
Blessings,
Cindy
Thank you, Cindy! I’ll be sharing my Halloween mantel on the next Amaze Me Monday. :)
Cindy – I just discovered that you featured my wreath! Thank you so much! Double dance of joy!
Very pretty, Kim! Your bow tutorial was very easy to understand. I love the idea of using the same wreath form and just changing out the embellishments.
Thank you so much, Kathy!
Fab wreath and great bow tutorial. That’s how I make my bows as well. You are one of the fan favorites today at the Sunday Showcase from the Make it Pretty Monday party at The Dedicated House. Pop on over and grab a Sunday Showcase feature button. Here is the link to this week’s showcase. http://thededicatedhouse.blogspot.com/2013/09/sunday-showcase-from-make-it-pretty_29.html to see your prettiness again tomorrow at the bash! Toodles, Kathryn @TheDedicatedHouse
Whoo hoo! Thank you, Kathryn! Literally did the happy dance around my kitchen with this news!
Thanks for the bow tutorial. Seems like I can never get mine to look “neat” and professional. maybe the wire helps it stand up? I’ll keep trying ;-D
JoAnn – The wired ribbon definitely helps, as does making sure that each loop is bigger than the one before it. When you get around to trying, if you find that a particular step is confusing, please let me know so that I can revise the description!
Love your wreath. I like the light, airy look of it…now you have me wanting to re-do mine. :) And I LOVE your idea for hanging it. I have a command hook on the door for an indoor wreath, but never thought to put it up high and attach a ribbon for the outside wreath. Great tutorial, too.
Hi Babs – Thank you so much for your kind comments! This is the first time I’ve used a command hook for my outdoor wreath but it really works!
I love your wreath!! I know what you mean about the disappointing ‘second season’ of wreaths. I’ve started redecorating some of my wreaths, too. They don’t look this good, though! Thanks for sharing it!
Thank you, Zenda!
That’s one of the prettiest I’ve seen this fall. Love the Give Thanks tag on there.
Wow, Stacey! Thank you so much for your kind comment!
Hi Kim!
Love your wreath! I think it is so cool to see the end result of other people’s creativity! I usually make seasonal wreaths, and change them when they look old and tired. Just bought some stems to give my door baskets a fall facelift!! Just need a few minutes to throw it together!!
Thanks again for the pics of the hanging bags! Just love them!
Have a lovely week!
Becky
Hi Becky – So glad you like the wreath! I had fun putting it together and what’s nice about keeping the base the same is that I don’t feel guilty if I want to change the look a bit by adding new stems when the season comes around again. Hope you post pictures of your door baskets when you’re done!